NetSuite is a cloud-based suite of business management applications. It offers a comprehensive set of tools for enterprise resource planning (ERP), financial management, customer relationship management (CRM), and e-commerce, providing a unified platform for businesses to streamline their operations and manage various aspects of their organization.
Refer to NetSuite's official documentation to see all available endpoints from the NetSuite API.
Authorize Connection to NetSuite
Dataddo offers two separate authorizers for NetSuite:
- NetSuite, which uses the NetSuite REST API, and
- Netsuite Analytics, which uses SuiteAnalytics Connect (ODBC/JDBC).
Each connection method has different requirements, capabilities, and limitations. To ensure you choose the most suitable option for your use case, please contact your Dataddo account manager before setting up either connector.
In NetSuite
To authorize your NetSuite account, you will need your account ID, client ID, client secret, a private key (= API token), a certificate ID. Follow these steps:
Add a New Integration in NetSuite
In your NetSuite account, navigate to the Setup page. Continue to the Integration page and click on **Manage Integration.
Click on New to add a new integration and fill in the following information:
- Name: Integration label, e.g. Dataddo.
- Uncheck everything in the section Token-based Authentication. If it's not possible to uncheck anything, follow these steps:
- In the OAuth 2.0 section: Check Client credentials.
- In the Token-based Authentication: Uncheck all fields.
- In the OAuth 2.0 section and Scope checkboxes, check all available fields (
RESTLETS,REST WEB SERVICES,SUITEANALYTICS CONNECT). - In the OAuth 2.0 section check Client Credentials (Machine to Machine grant).
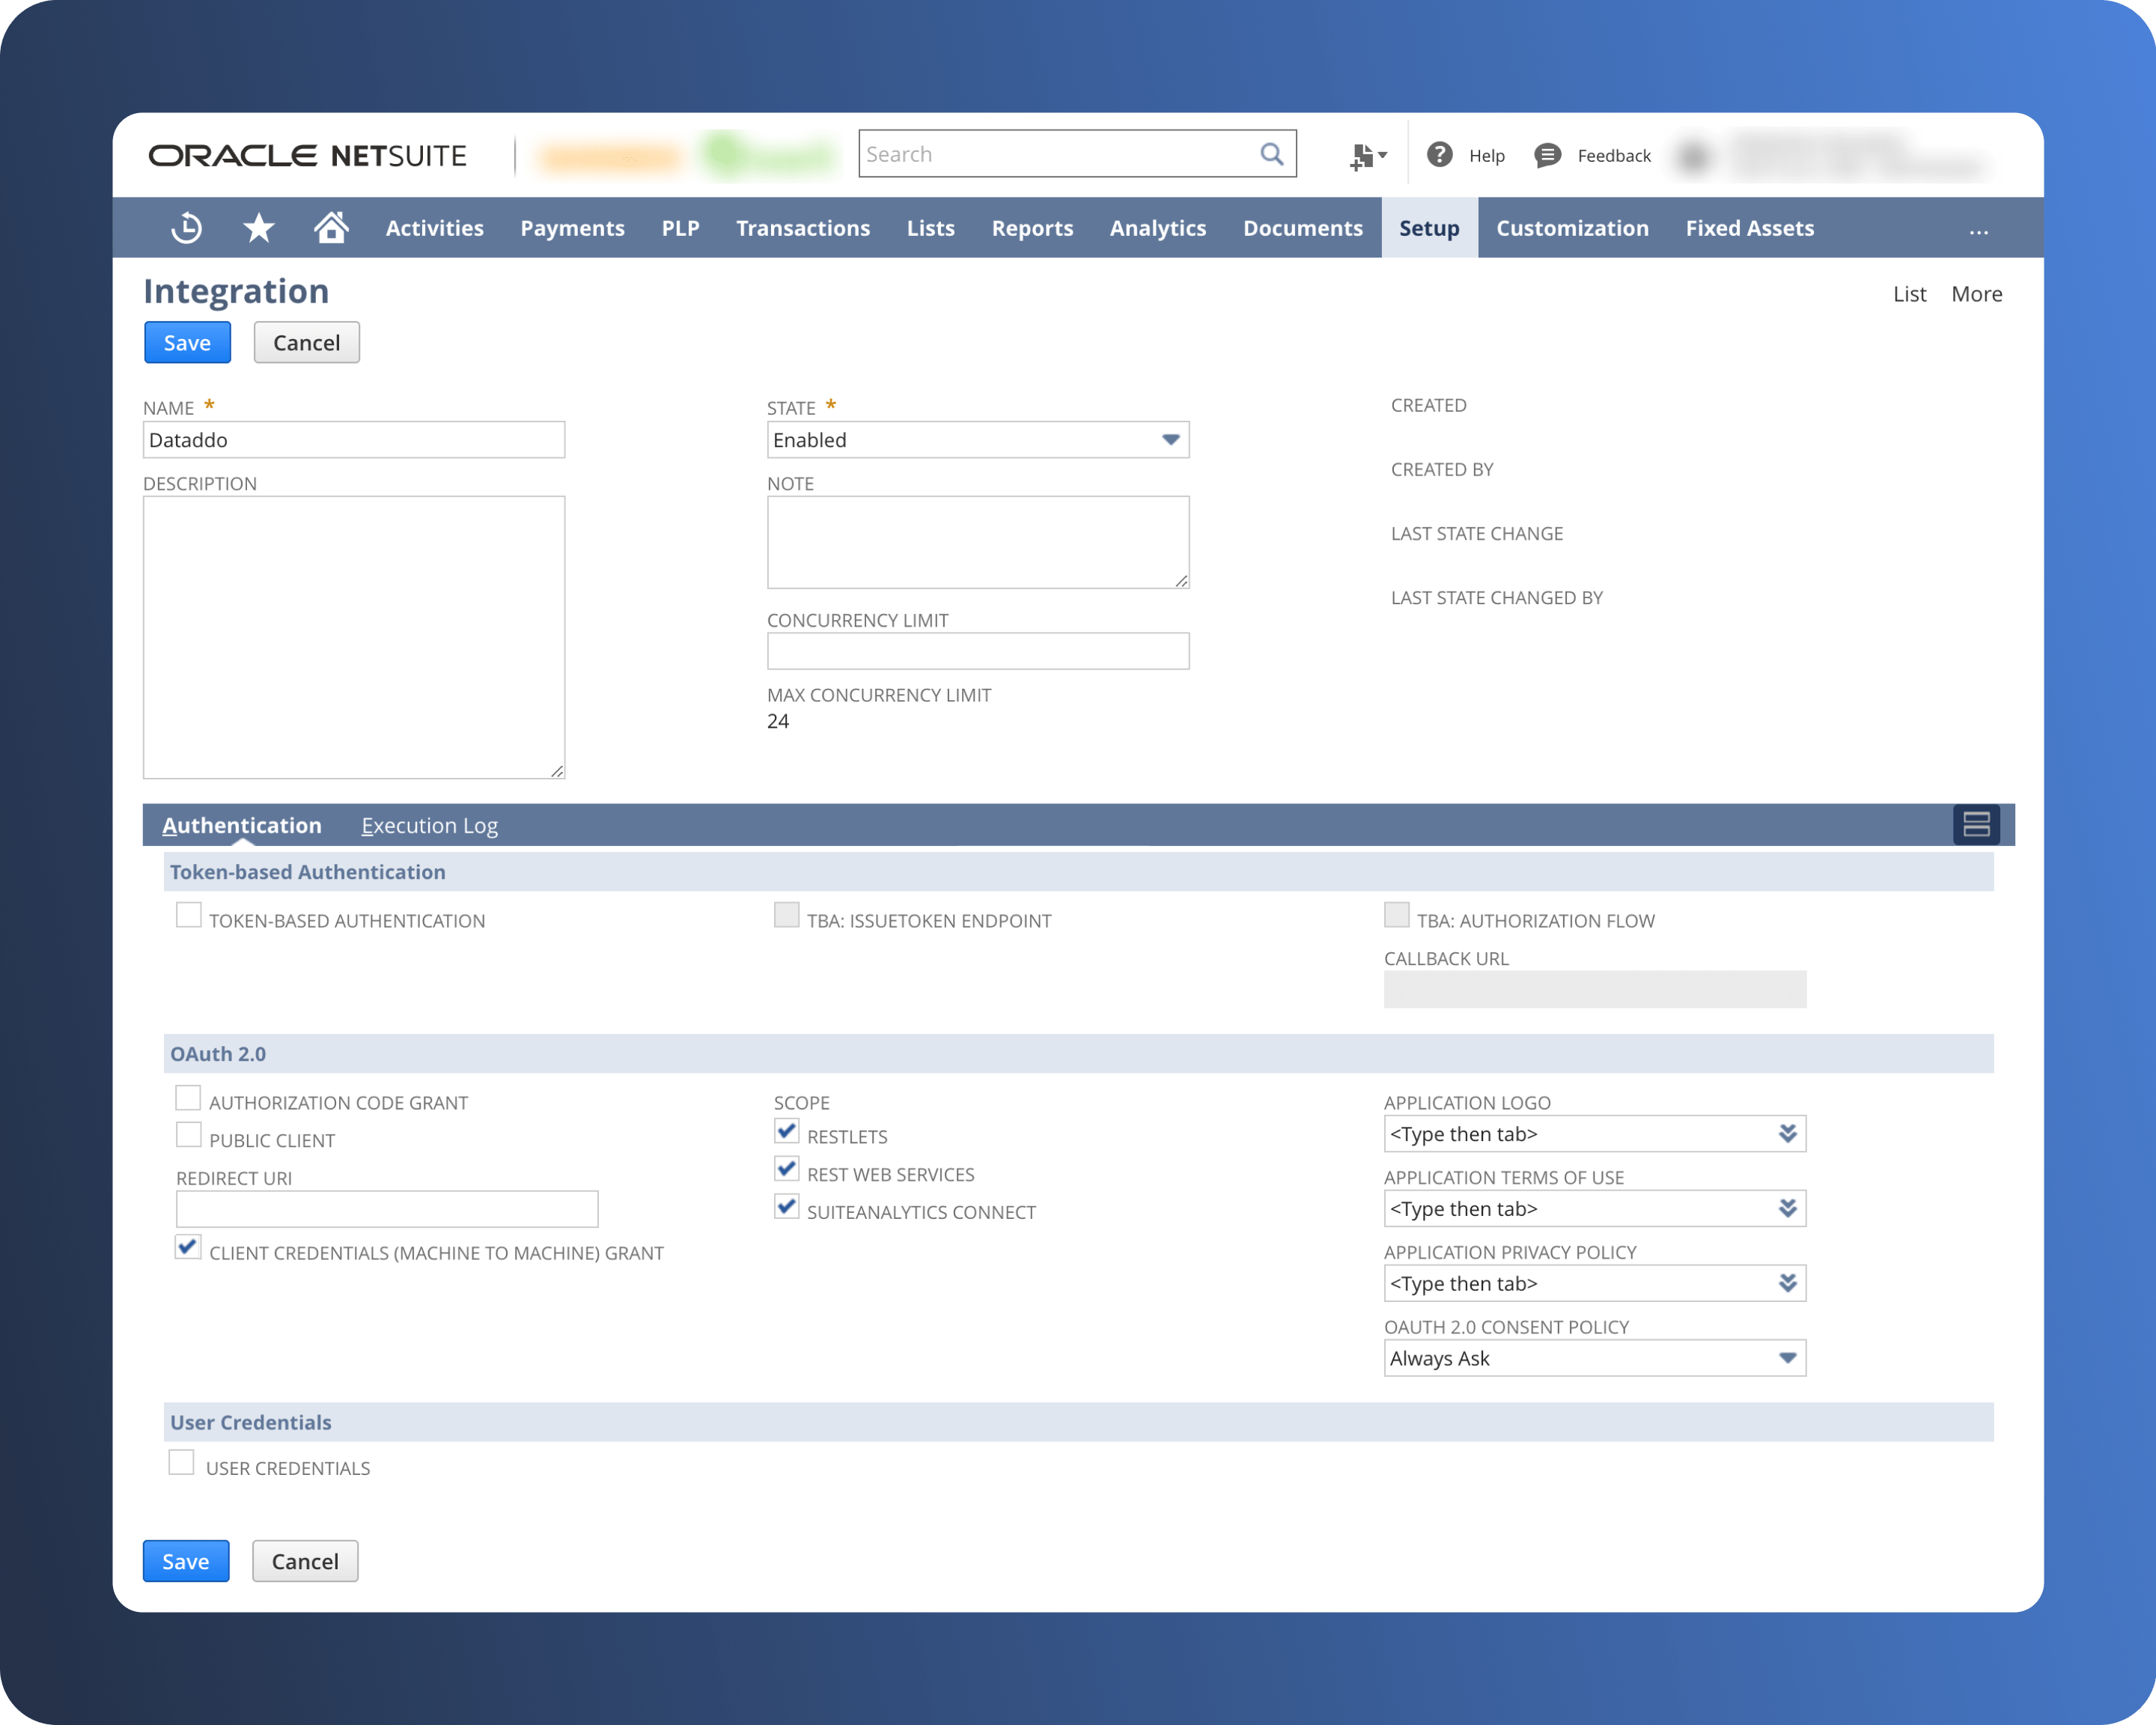
- Save the integration.
- Copy the Client ID (Consumer ID) and Client Secret (Consumer Secret) at the bottom of the page.
Generate an RSA Key
On your machine with OpenSSL installed, run the following command to generate two keys.
- A public key
auth-cert.pemto upload to NetSuite, and - A private key
auth-key.pemto upload to Dataddo
openssl req -x509 -newkey rsa:4096 -sha256 -keyout auth-key.pem -out auth-cert.pem -nodes -days 730
In Windows, OpenSSL is not a part of the standard package. It is recommended to first download Git For Windows and run the command in Git Bash.
Upload Public Key to NetSuite
- In your NetSuite account, navigate to the Setup page and select Integration and continue to the Manage Authentication section.
- Go to OAuth 2.0 Client Credentials (M2M) Setup and click on New.
- Configure the following fields:
- Entity: Select a user with the
Log in using OAuth 2.0 Access Tokenspermission. - Role: Select a role with the
Log in using OAuth 2.0 Access Tokenspermission. - Application: Select your application/integration e.g. Dataddo. You will see your integration only if you checked the Client Credentials (Machine to Machine grant) box when adding it.
- Entity: Select a user with the
- Select the public key from the previous step as the Certificate.
- Once you Save, copy the Certificate ID.
In Dataddo
First upload the Private Key to Dataddo.
- Navigate to the Security page.
- Go to the Certificates & Tokens tab and click on Add Certificate.
- Choose RSA Private Key certificate type and upload the the private key you generated in App Store Connect.
Then create a NetSuite authorizer.
- On the Authorizers page, click on Authorize New Service and select NetSuite.
- Fill in the following fields:
- Account ID: Your NetSuite account ID. It should be in the format
0000000-sb1. - Client ID: Your NetSuite client ID.
- Client Secret: NetSuite client secret.
- Private Key: Private key you uploaded to Dataddo.
- Certificate ID: Certificate ID to the private key.
- Account ID: Your NetSuite account ID. It should be in the format
- Rename your authorizer for easier identification and click on Save.
How to Create a NetSuite Data Source
- On the Sources page, click on the Create Source button and select the connector from the list.
- From the drop-down menu, choose your account.
Didn't find your account?
Click on Add new Account at the bottom of the drop-down and follow the on-screen prompts. You can also go to the Authorizers tab and click on Add New Service.
- Name your data source and select your Object and Attributes. SuiteQL query will be auto-generated based on the object and attributes you selected.
- [Optional] Modify the SuiteQL query if e.g. your object or attributes weren't available for selection.
- Configure your snapshotting preferences. Choose your sync frequency or the exact synchronization time under Show advanced settings.
- Preview your data by clicking on the Test Data button in the top right corner. You can adjust the date range for a more specific time frame.
- Click on Save and congratulations, your new data source is ready!
You can choose one object (=record in NetSuite) per data source. An object represents a dataset (e.g. Account, Contact, Customer, Transactions, ...).
Attributes represent individual columns available for each object. You can select only some attributes or all of them.
List of Available Attributes
To check all available NetSuite object attributes to select the right ones, follow these steps:
- In your Netsuite account, navigate to the Setup page, and continue to Records Catalog. Here, you will find a list of available standard and custom records (=objects in Dataddo).
- Select your record, and make sure you're on the Fields tab to see all available fields (=attributes in Dataddo).
- In Dataddo, select only fields (attributes) which you see in the Records Catalog, or add them manually in the SuiteQL query modification step.
Working with Saved Searches
To connect to Saved Searches in NetSuite via Dataddo, you need to expose the search results through a RESTlet. This involves deploying a RESTlet script in NetSuite that retrieves data from the Saved Search and makes it accessible via a unique URL. Once the RESTlet is set up, you can use the Universal JSON Connector in Dataddo to connect to it. Simply enter the RESTlet URL, select the existing NetSuite authentication, and configure the data extraction settings.
Adding RESTlet in Netsuite
- Create Script and Deployment Records. Navigate to Customization > Scripting > Scripts > New to create a new script record, associating it with the RESTlet script below. Then, create a script deployment record, setting the Status field to Released to allow external access.
- Determine the RESTlet URL. After saving the deployment, NetSuite generates a unique URL for your RESTlet, visible in the deployment record. Save this URL for later use in Dataddo connector. It will look like this
https://00000.restlets.api.netsuite.com/app/site/hosting/restlet.nl?script=000&deploy=1&savedSearchId=000

/**
 * @NApiVersion 2.x
 * @NScriptType Restlet
 */
define(['N/search'], function (search) {
    function getSavedSearchResults(request) {
        var savedSearchId = request.savedSearchId;
        var page = parseInt(request.page, 10) || 0; // Default to first page (0-based index)
        var pageSize = parseInt(request.pageSize, 10) || 1000; // Default to 1000, max size
        var results = [];

        try {
            // Load the saved search
            var savedSearch = search.load({ id: savedSearchId });

            // Use runPaged() to handle large result sets
            var pagedResults = savedSearch.runPaged({
                pageSize: pageSize // Use requested page size
            });

            // Validate the requested page
            if (page < 0 || page >= pagedResults.pageRanges.length) {
                return JSON.stringify({
                    status: 'error',
                    message: 'Invalid page number.'
                });
            }

            // Fetch the specific page
            var currentPage = pagedResults.fetch({ index: page });

            // Iterate through results on the current page
            currentPage.data.forEach(function (result) {
                results.push({
                    id: result.id,
                    columns: result.columns.map(function (column) {
                        return {
                            name: column.name,
                            value: result.getValue(column)
                        };
                    })
                });
            });

            // Return results along with pagination info
            return JSON.stringify({
                status: 'success',
                page: page,
                pageSize: pageSize,
                totalPages: pagedResults.pageRanges.length,
                totalResults: pagedResults.count,
                results: results
            });
        } catch (e) {
            log.error({
                title: 'Error in getSavedSearchResults',
                details: e.message
            });
            return JSON.stringify({
                status: 'error',
                message: e.message
            });
        }
    }

    return {
        get: getSavedSearchResults
    };
});
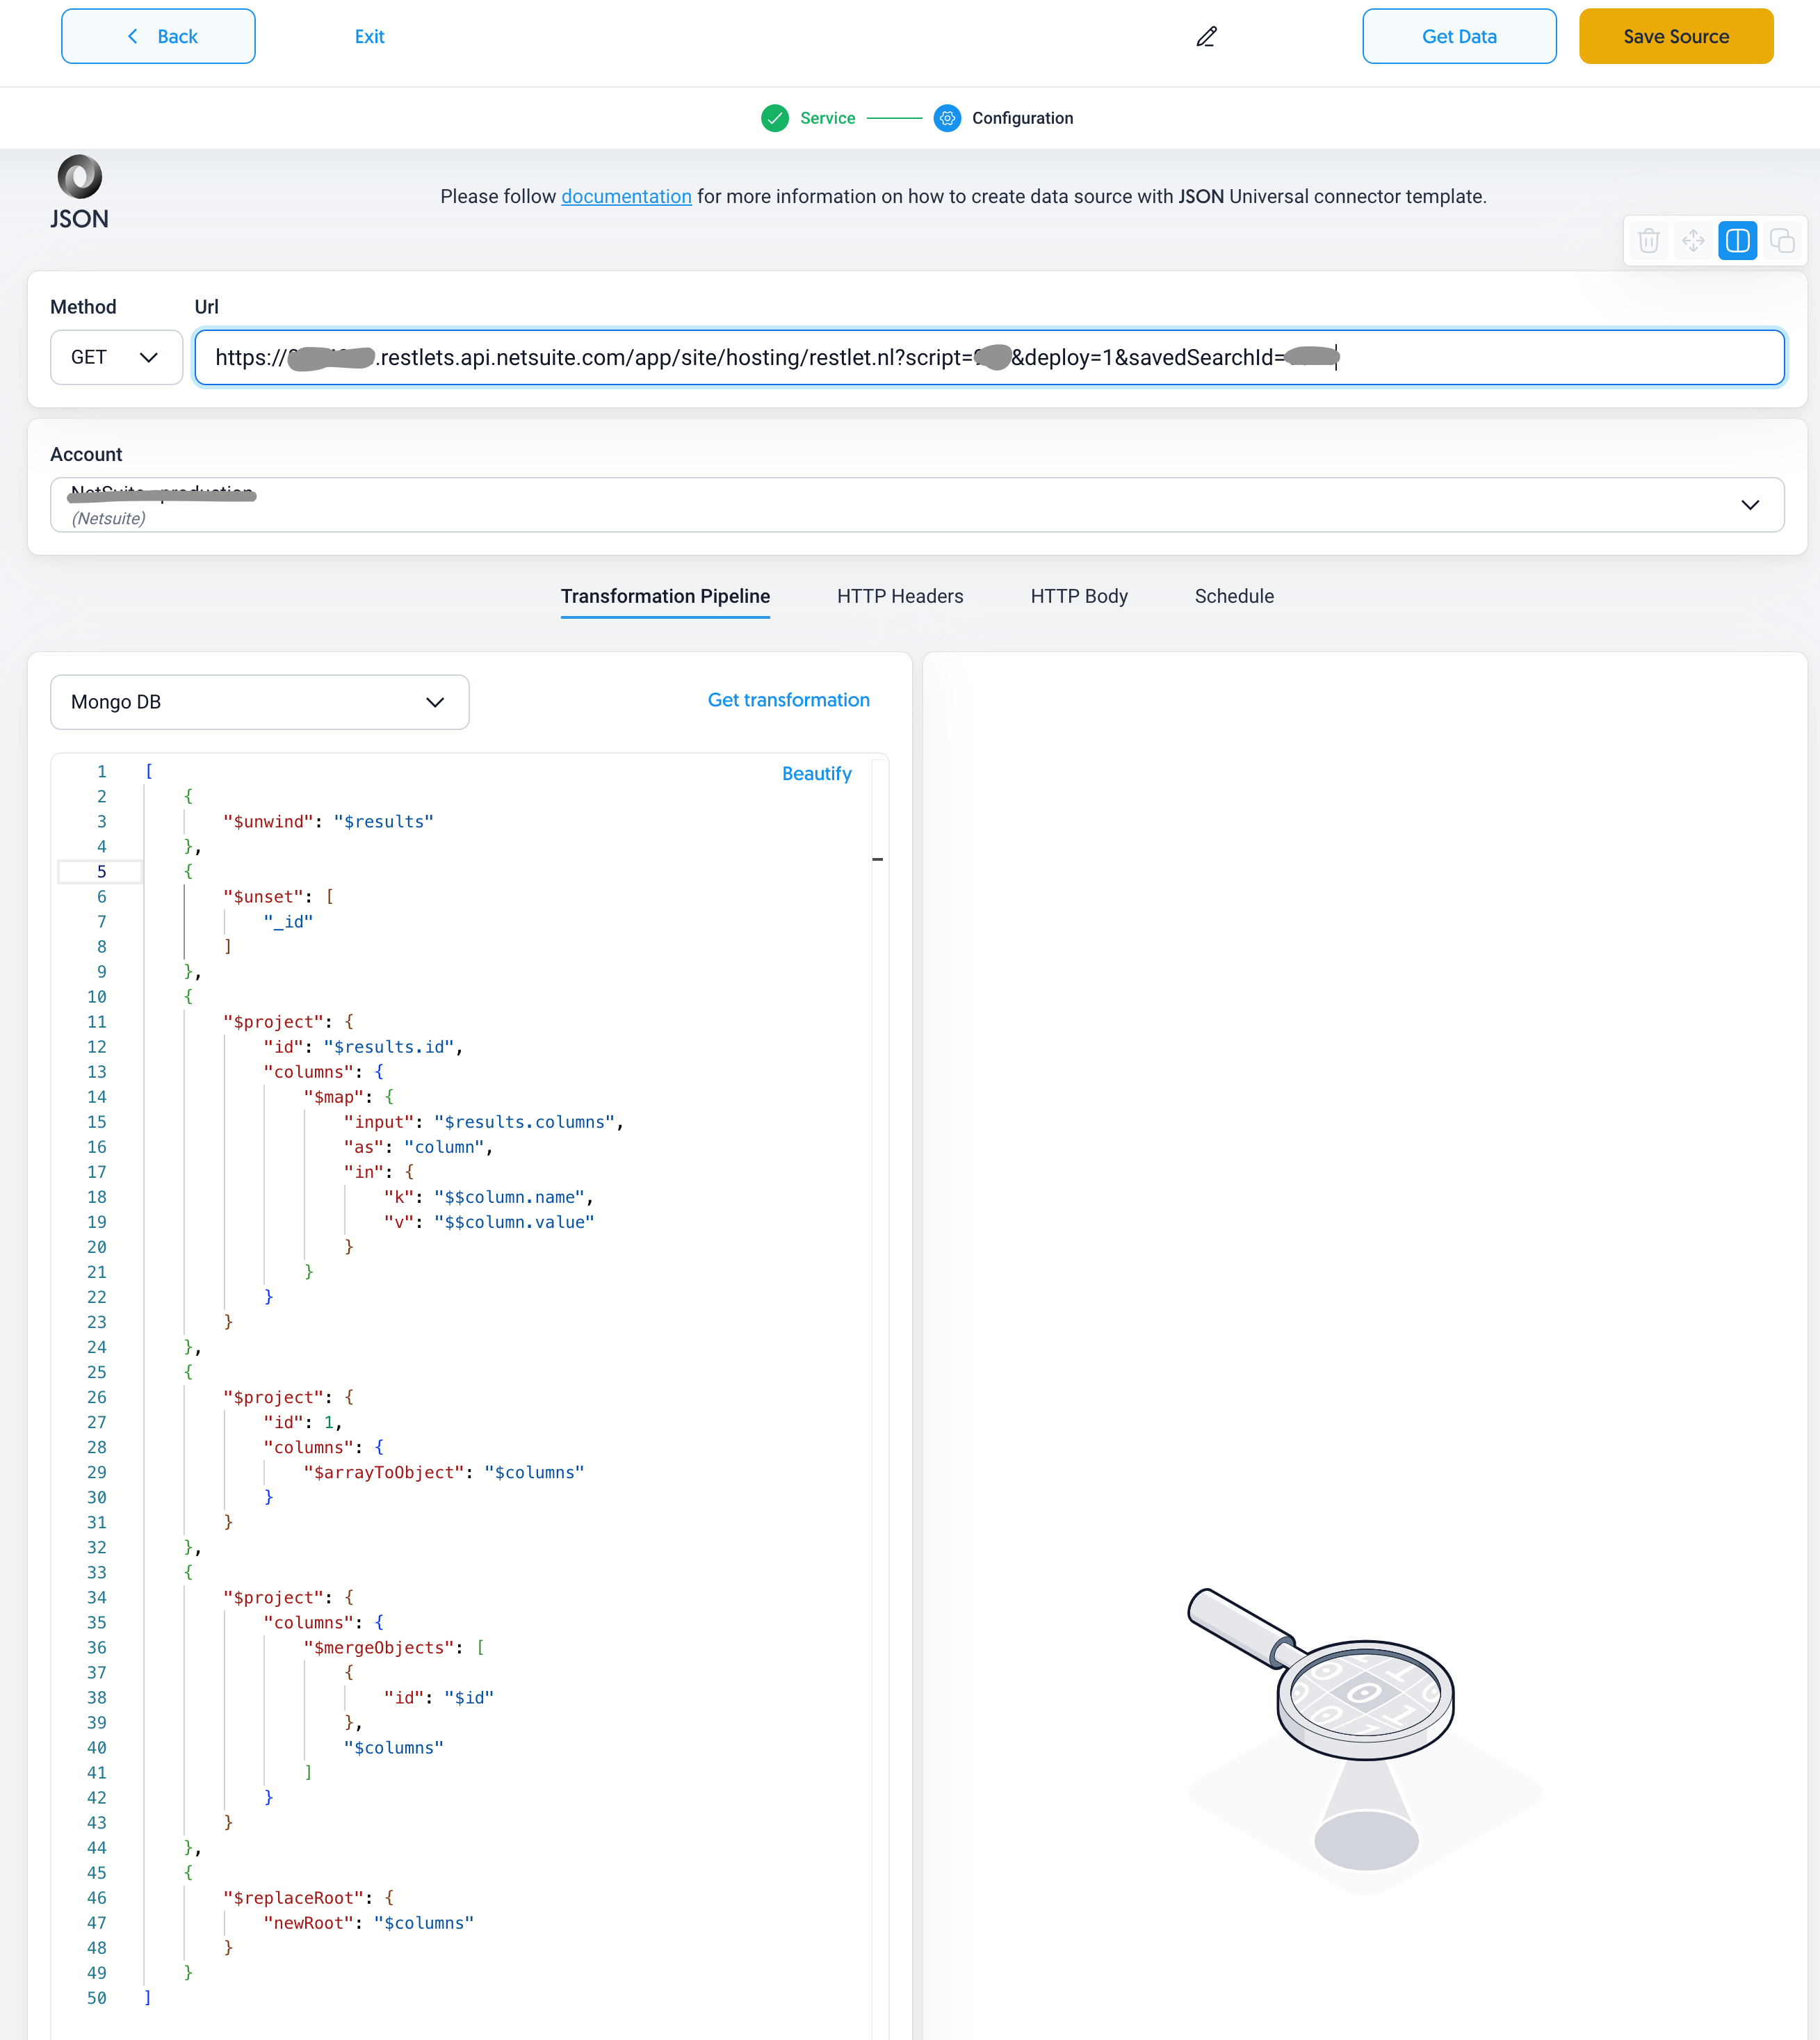
Setting up Universal JSON Connector in Dataddo
After setting up the RESTlet in NetSuite, you can connect it to Dataddo using the Universal JSON Connector. In the Dataddo interface, create a new JSON source, enter the RESTlet URL, select the NetSuite authentication as described in step-by-step guide below.
- In the Dataddo Sources page, click Create Source and select Universal JSON Connector.
- In the URL field, paste the RESTlet URL obtained from the NetSuite script deployment.
- Under the Account section, choose the NetSuite Authorizer that was previously configured in Dataddo.
- Copy and paste the transformation pipeline script below into the Transformation Pipeline field.
- Save & Test to validate the setup, then proceed with linking the source to a destination.
[
    { "$unwind": "$results" },
    { "$unset": ["_id"] },
    {
        "$project": {
            "id": "$results.id",
            "columns": {
                "$map": {
                    "input": "$results.columns",
                    "as": "column",
                    "in": { "k": "$$column.name", "v": "$$column.value" }
                }
            }
        }
    },
    {
        "$project": {
            "id": 1,
            "columns": { "$arrayToObject": "$columns" }
        }
    },
    {
        "$project": {
            "columns": { "$mergeObjects": [{ "id": "$id" }, "$columns"] }
        }
    },
    { "$replaceRoot": { "newRoot": "$columns" } }
]
The completed configuration in the Universal JSON Connector should appear as follows:
Limitations
Batch size
Due to the limitations of Netsuite API it is not possible to extract more than 1 million records in a single operation. If this applies to your situation, please consider editing the SuiteQL query directly and adding a WHERE condition to limit the amount of data extracted in each batch to under 1 million records.
If you need to perform a one-time data backfill operation, please try gradually modifying the SuiteQL query to capture all the results. Feel free to contact us for assistance.
Troubleshooting
Data Preview Unavailable
If there is no data preview after clicking on Test Data, there might be a problem with your source configuration. The most common causes are:
- Date range: Try a smaller date range. You can load the rest of your data afterward through our manual data load function.
- Insufficient permissions: Please make sure your authorized account has the
Log in using OAuth 2.0 Access Tokenspermission. - Invalid metrics, attributes, or breakdowns: You may not have any data for the selected metrics, attributes, or breakdowns.
- Incompatible combination of metrics, attributes, or breakdowns: The combination you have selected cannot be queried together. Please refer to the service's documentation to view a full list of metrics that can be included in the same source.
Missing Object or Attributes
If your object or attributes aren't available for selection during data source configuration, modify or rewrite your SuiteSQL query.
For the full list of Netsuite objects and attributes, see the Netsuite Analytics Browser.
Increasing the Amount of Extracted Rows
The initial data extraction load is pre-set to 1,000 rows. To raise the number of extracted rows, click on your data source, navigate to the Advanced Settings and change the Limit.
NetSuite Connection Keeps Breaking
If your NetSuite keeps breaking after a few days, make sure the Client Credentials (Machine to Machine grant) is checked during Authorization.
Invalid Login Attempt Error Message
Make sure the account you're authorizing has the Log in using OAuth 2.0 Access Tokens permission. Carefully follow all Authorization steps.
Transformation Error
ERROR MESSAGE
cannot append value to column ID customlist_vitsoe_region: unhandled data type of map. Please modify the transformation to parse this, column can't contain non-scalar data (objects, arrays)
To overcome this issue, rename the customlist_vitsoe_region.name field in your SuiteQL query. The whole query should look like this:
SELECT foreigntotal, type, tranid, entity, tosubsidiary, trandate, shipdate, shippingaddress, custbody_vitsoe_job_owner, customlist_vitsoe_region.name as name FROM transaction, customlist_vitsoe_region WHERE transaction.custbody_vitsoe_region=customlist_vitsoe_region.id
This issue is caused during data tranformation. When extracting NetSuite data, Dataddo receives a field called name coming from the customlist_vitsoe_region table. However, the Dataddo NetSuite connector extracts a field called customlist_vitsoe_region.name (in MongoDB this would be an object because dots can't be used as field names). In the modified SuiteQL query, the two fields are connected using the AS clause.
Related Articles
Now that you have successfully created a data source, see how you can connect your data to a dashboarding app or a data storage.
Sending Data to Dashboarding Apps
Sending Data to Data Storages
Other Resources