Dataddo's Data Backfilling feature enables you to add historical data to storage solutions like BigQuery, Snowflake, or Databricks. This makes your data storage comprehensive, including both current and past data, improving your analytics and reporting capabilities.
See Full Data Re-Sync to load all your historical data at once.
If your destination is a dashboarding app like Looker Studio, Power BI, or Tableau, refer to this article.
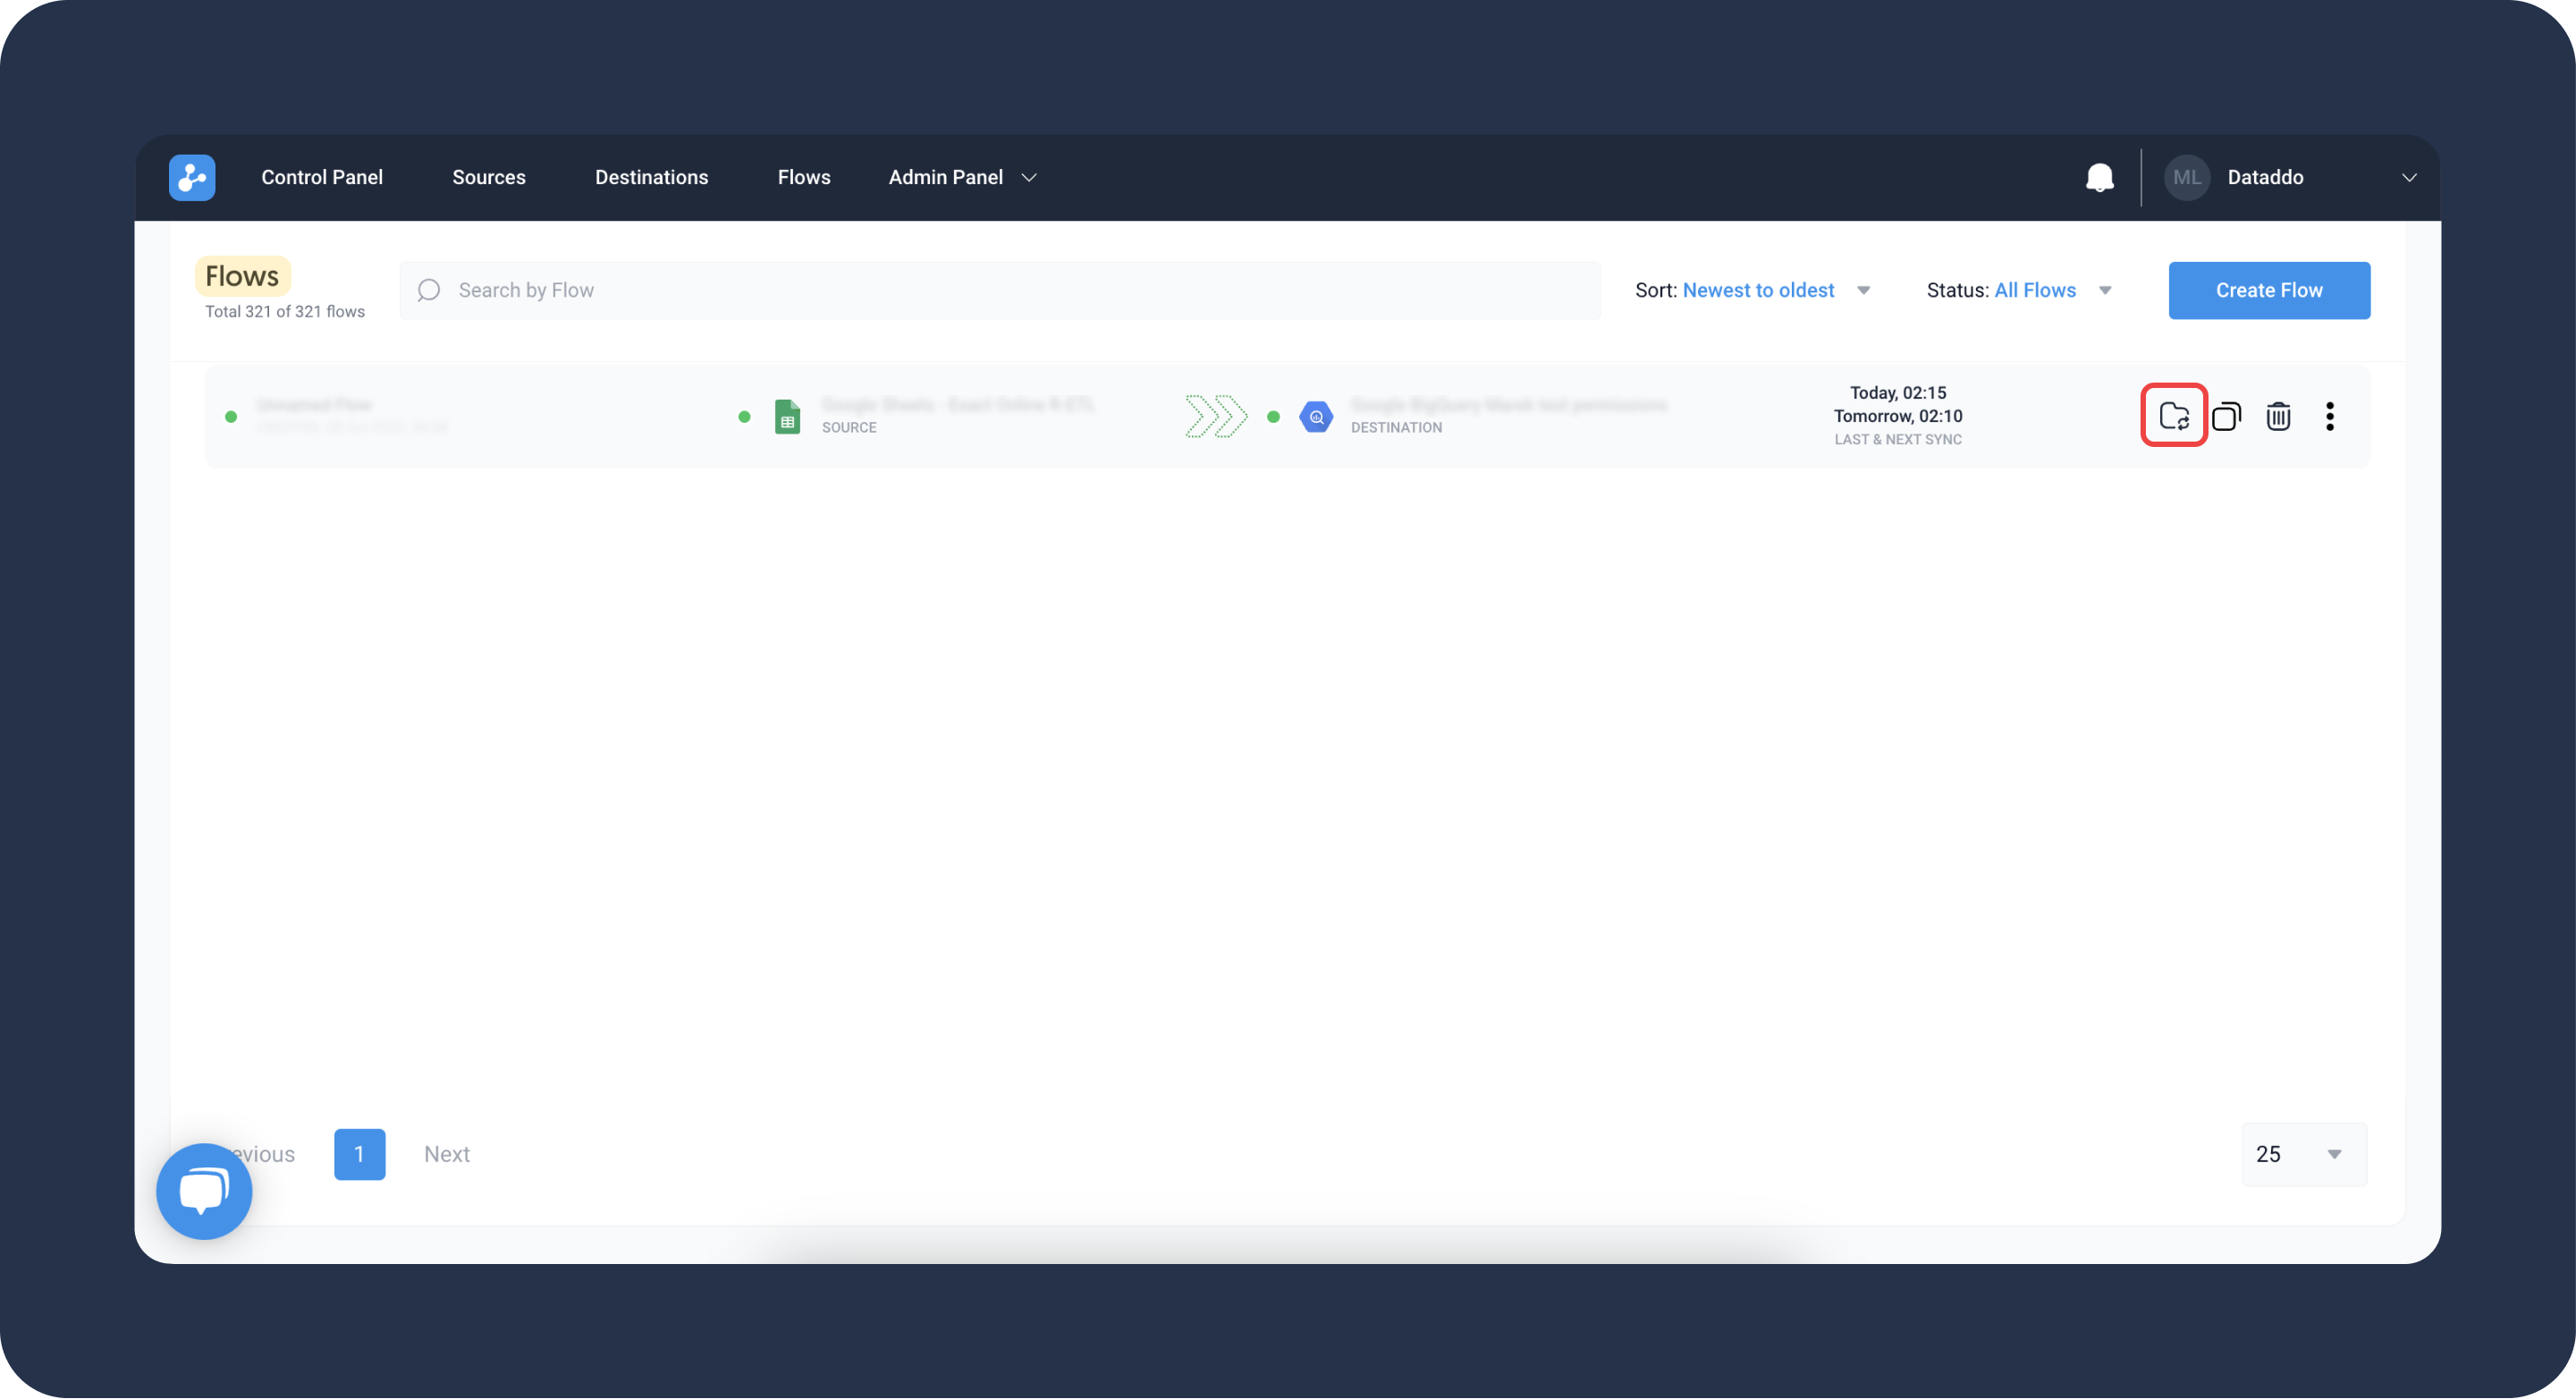
The Process
- Go to the Sources page and trigger the extraction for your selected source and choose your date range.
- If the UI does not offer a date range picker, you can temporarily override the source configuration.
- Initiate the data writing in the relevant flow.
- For long timeframes, consider breaking the process into smaller segments and repeating as necessary.
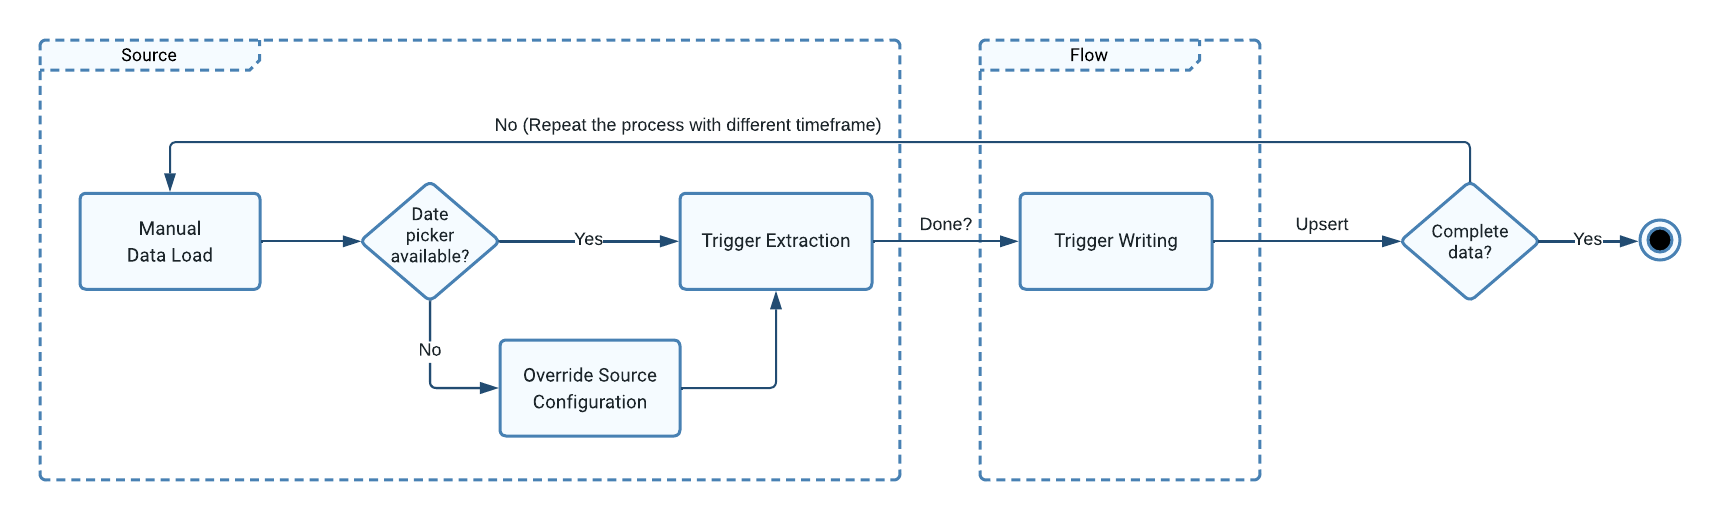
Trigger the Extraction
- Go to the Sources page and click on your source.
- Click on the Manual Data Load button next to your source.
- Select your date range. If the date picker is not present, temporarily override the source configuration.
- Set the Snapshot Keeping Policy to Replace.
- Click on Load Data to initiate the extraction.
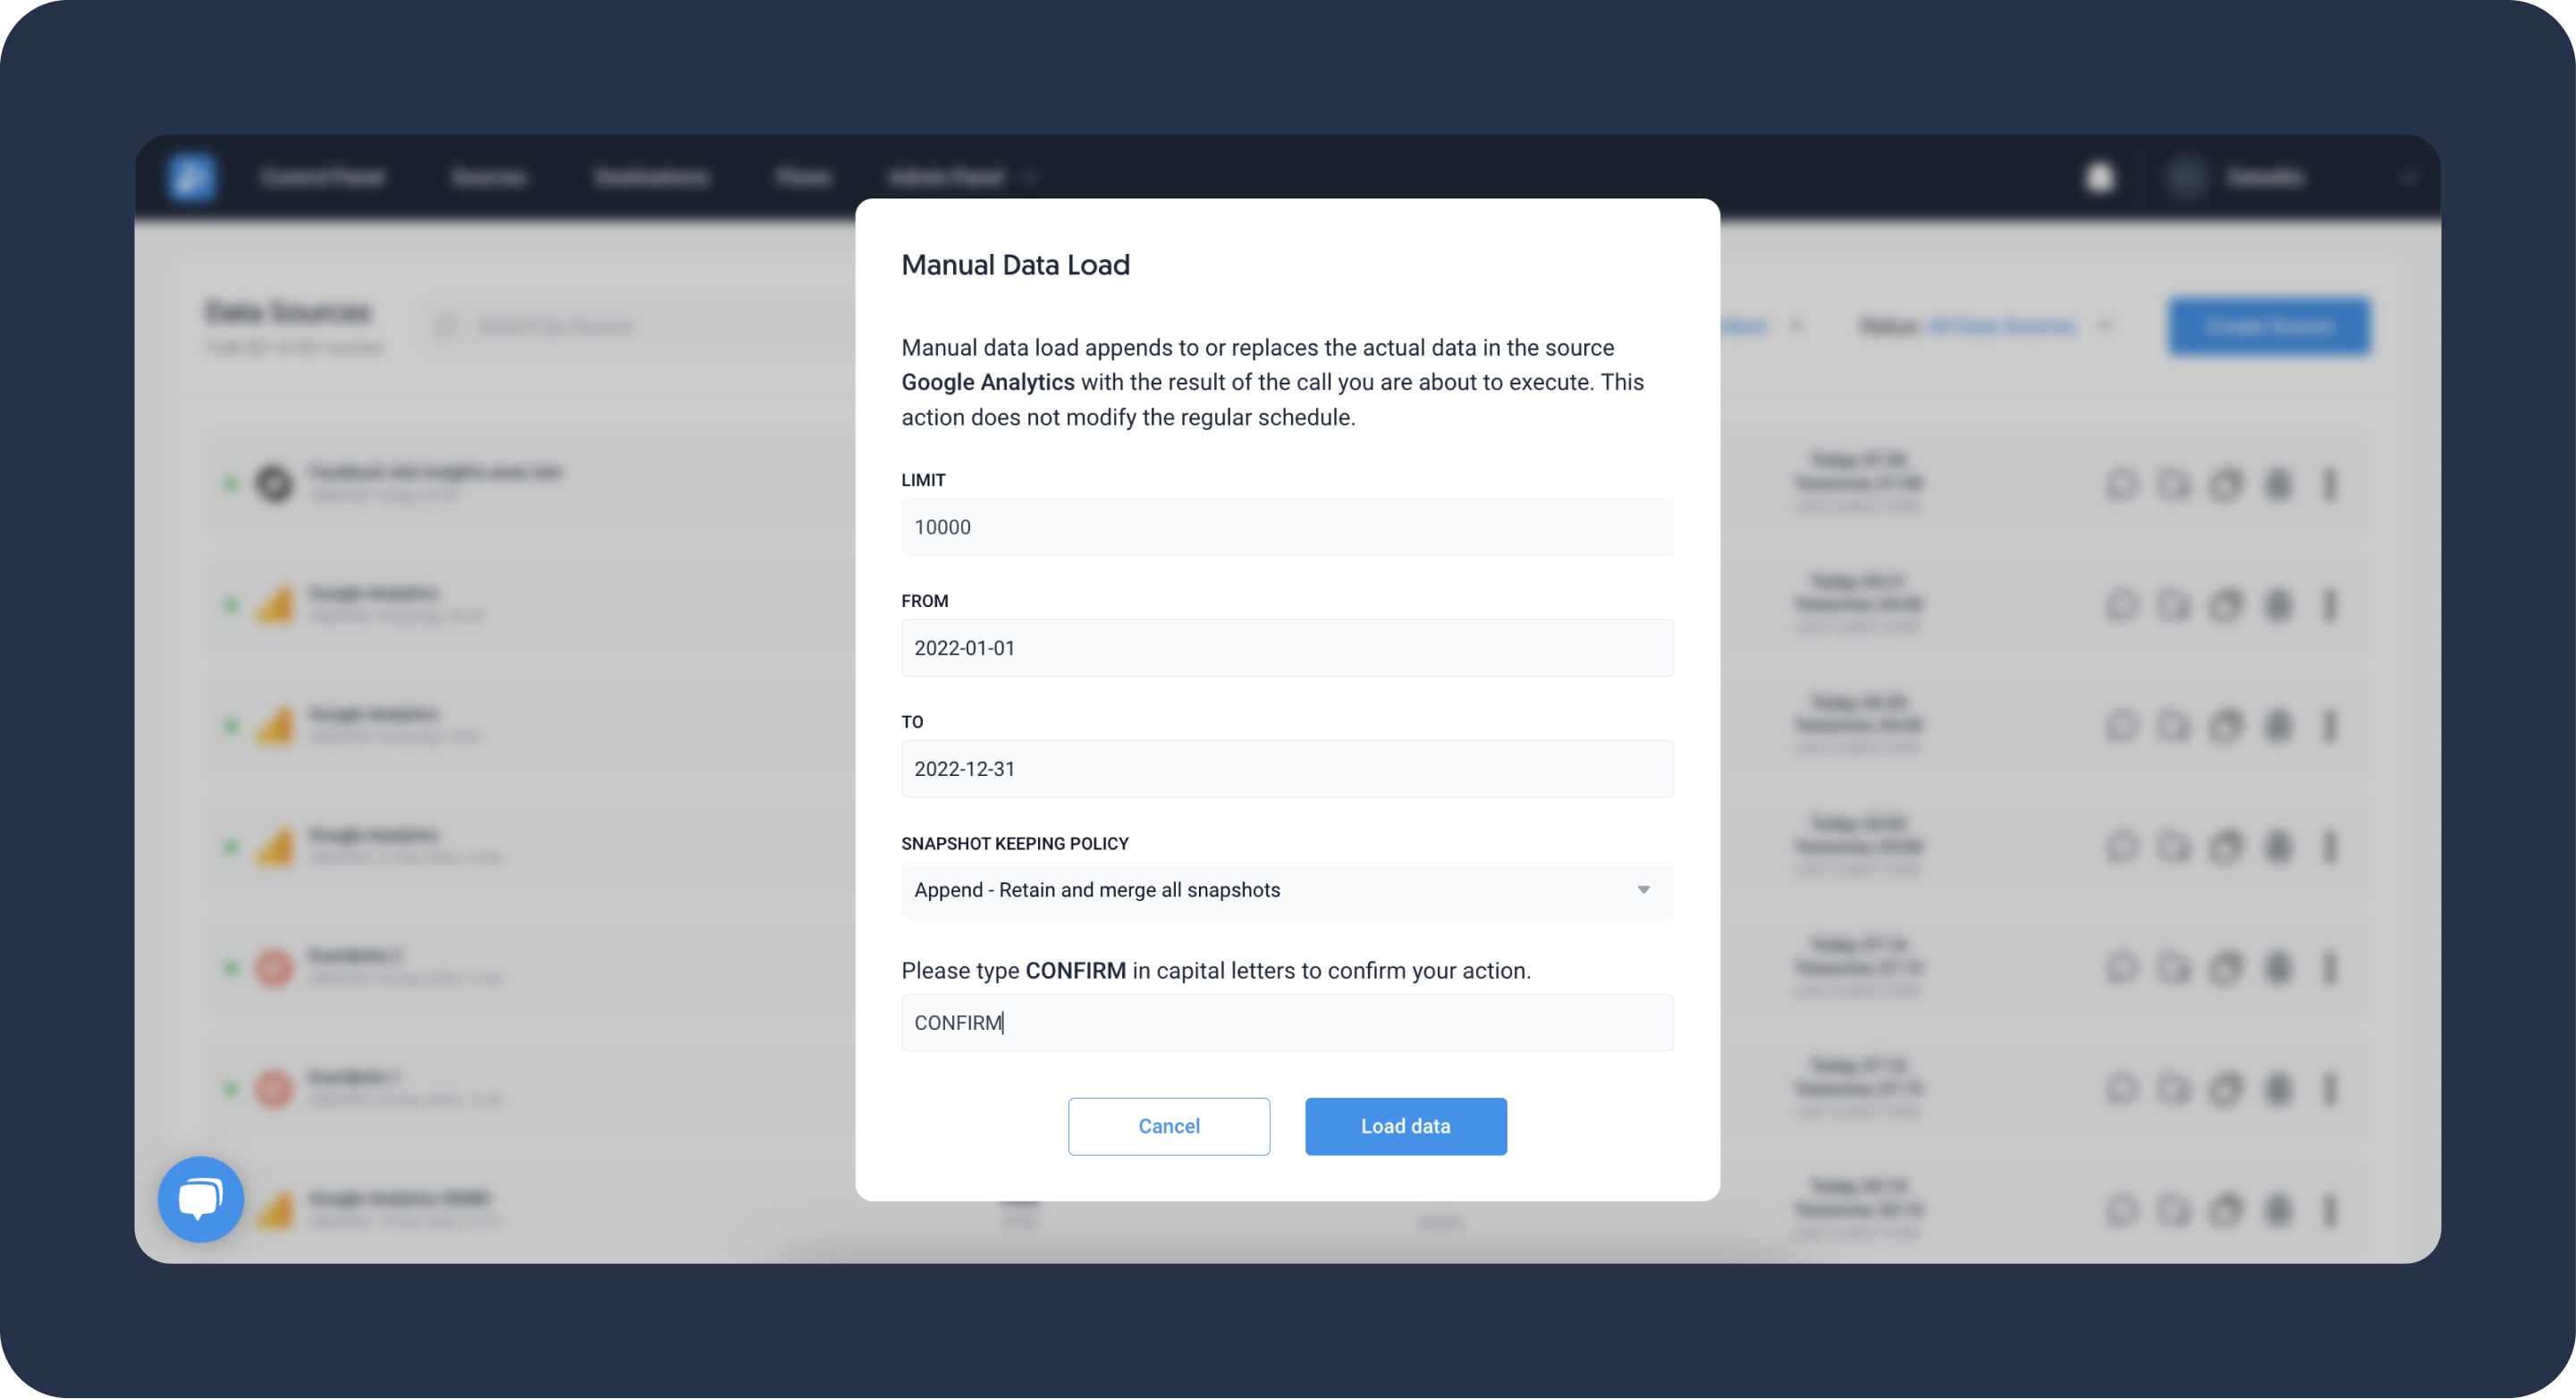
Override Source Configuration
Once data backfilling is complete, please revert the source configuration to its original settings to ensure smooth regular data extractions.
When the calendar date picker is not available, you can override this by adjusting the source URL.
- Go to the Sources page and click on your source.
- Navigate to the Advanced Settings tab and locate the URL field.
- Change the date range query parameters (for more details, see the following section).
- Save the source configuration.
Change Date Range
The date range in your source URL can be indicated by e.g.
- startDate and endDate
- since_send_time and before_send_time
- start and end
In the source URL, look for strings such as {{1d1}} which represent a placeholders for the definition of the dynamic timeframe. It will look like the following example.
https://us16.api.mailchimp.com/3.0/campaigns?offset=0&count=500&since_send_time={{1d1}}&before_send_time={{1d1}}
Replace the placehoders with:
A static string representing a specific time frame, for example:
https://us16.api.mailchimp.com/3.0/campaigns?offset=0&count=500&since_send_time=2020-09-01T00:00:00+00:00&before_send_time=2020-09-14T23:59:59+00:00
A dynamic date range. In the example below we want to extract last 90 days' data, including today.
https://us16.api.mailchimp.com/3.0/campaigns?offset=0&count=500&since_send_time={{90d0}}&before_send_time={{90d0}}
For more information, see Setting Date Range.
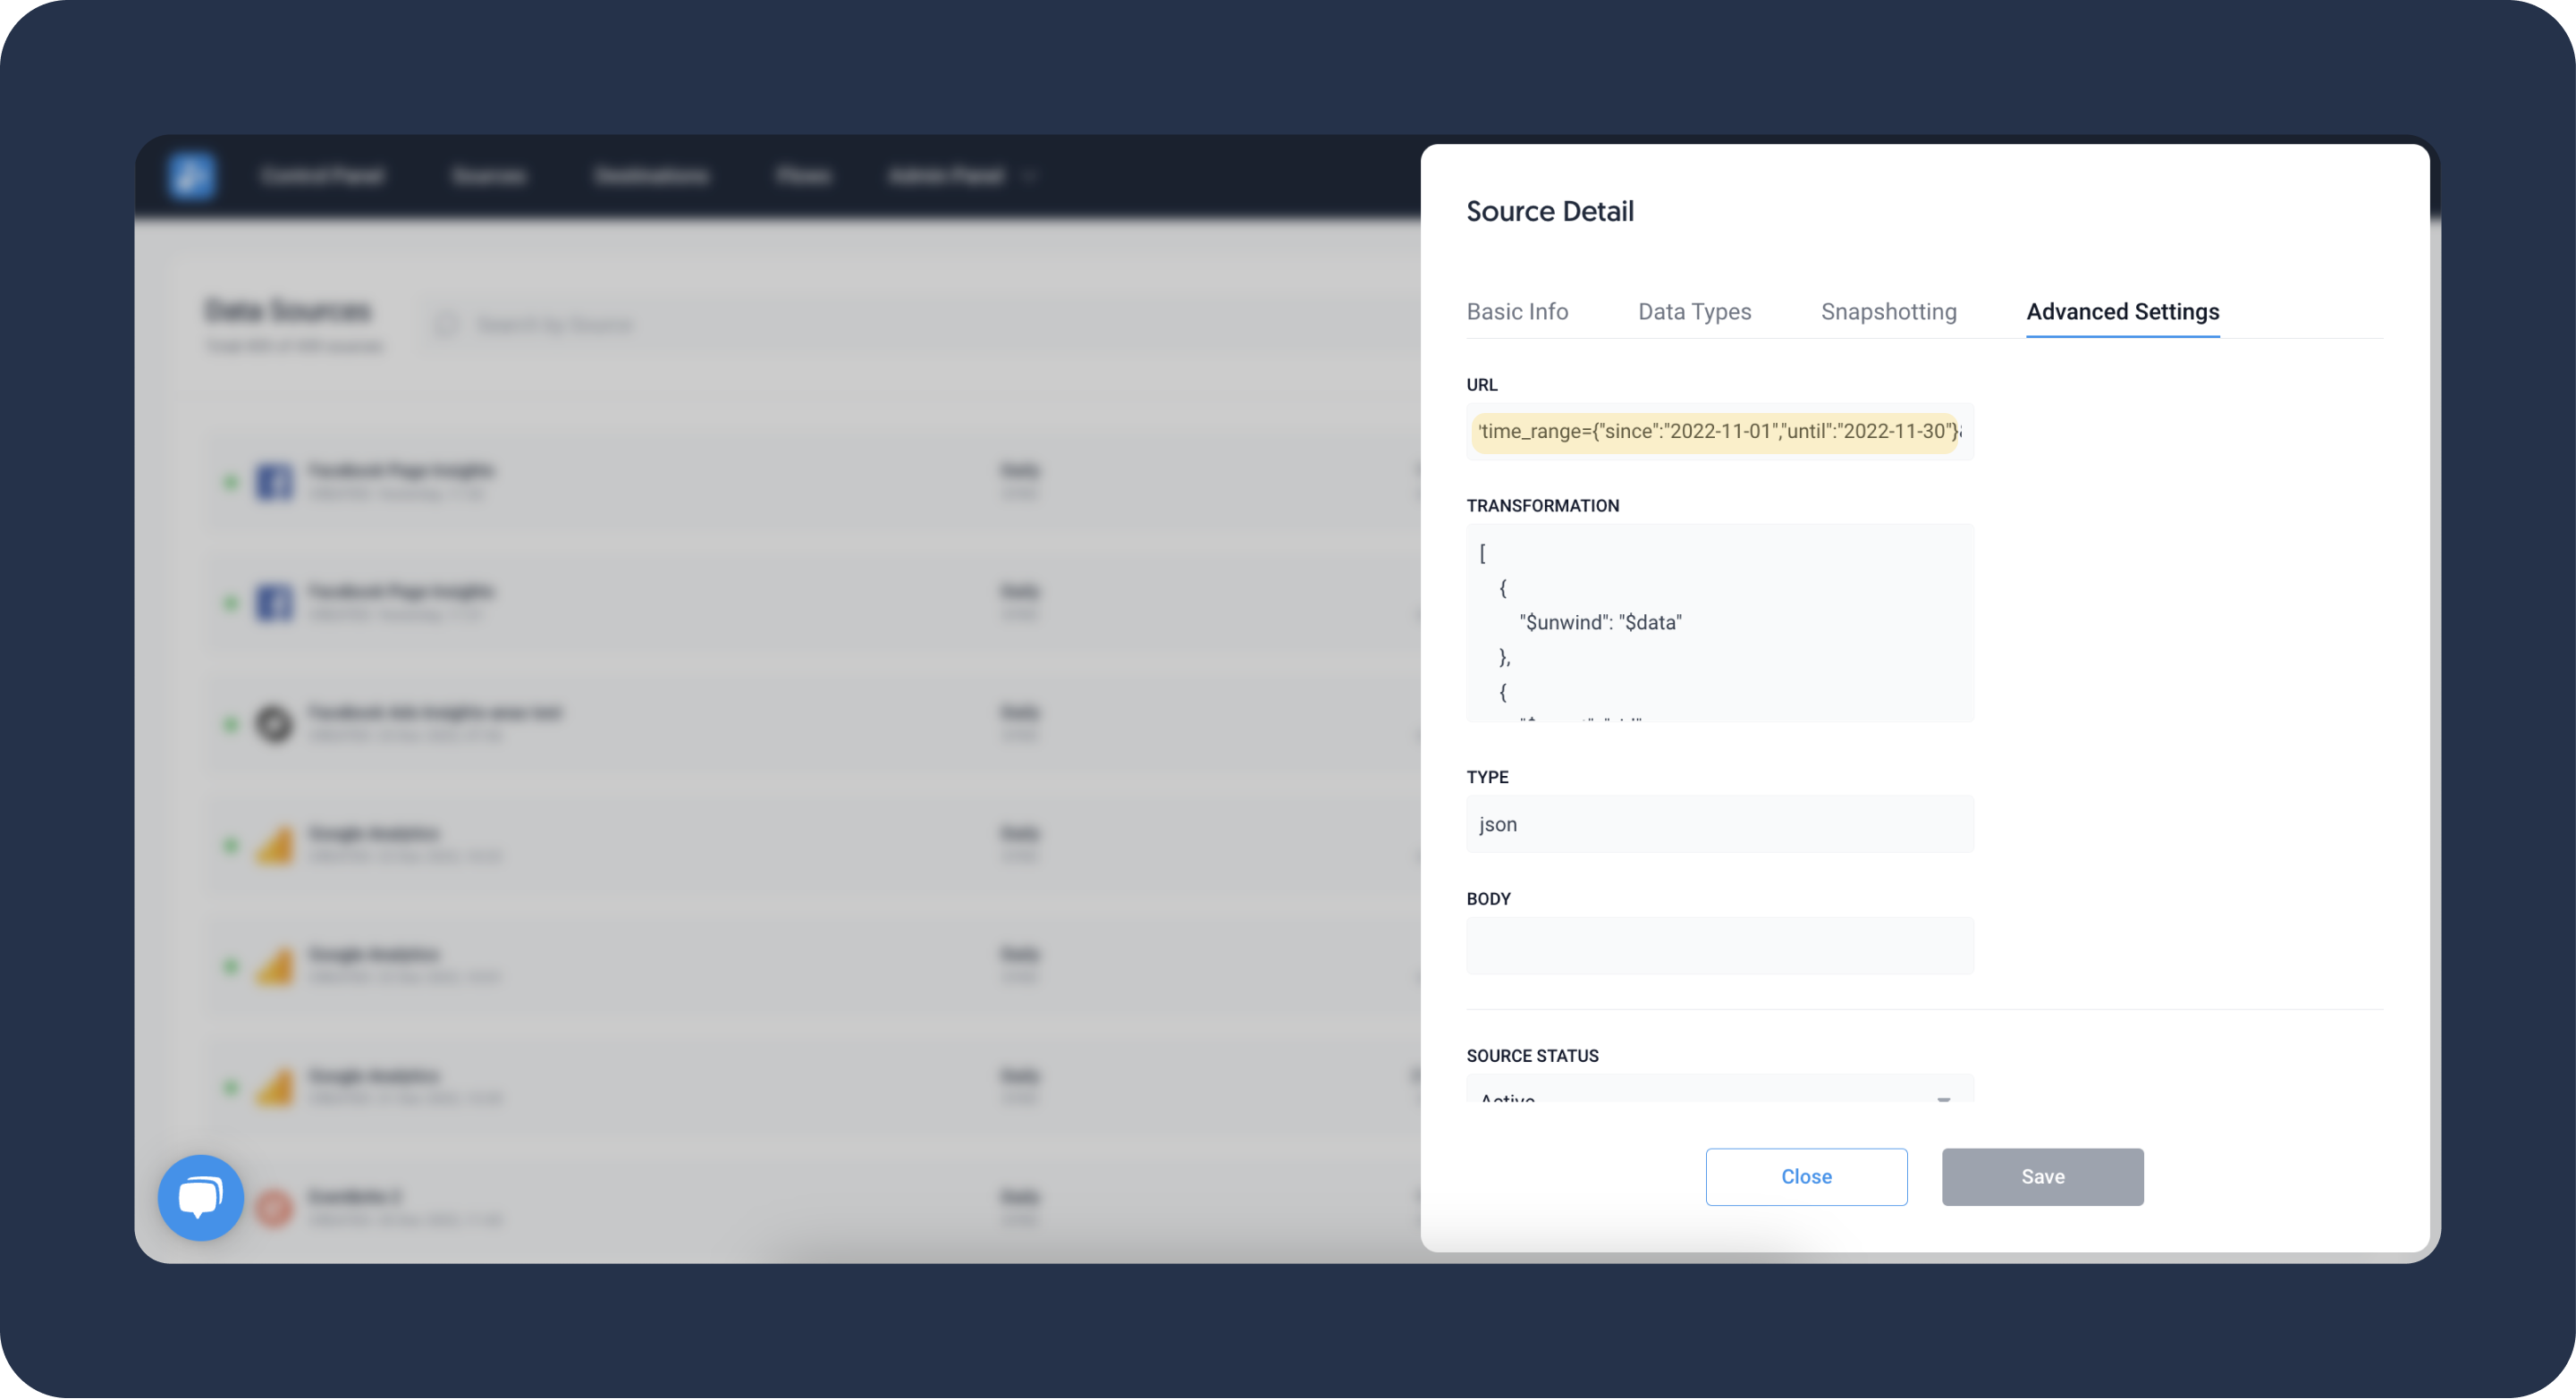
Trigger the Writing to the Storage
Before starting this operation, please check the write mode of your flow. We recommend using upsert, which either adds new records or updates existing ones, reducing the risk of duplicate entries.
- Go to the Flows page and click on the Manual Data Insert button next to your flow.
- Confirm the data insert and click on Insert Data.
- Confirm the operation was successful by checking logs or inspecting the warehouse directly.
Troubleshooting
Context Deadline Exceeded Error
rpc error: code = DeadlineExceeded desc = context deadline exceeded
This issue may be caused by extracting data over an extended timeframe. Please override the source configuration to a shorter timeframe.
Cannot Change Write Mode to Upsert in Existing Flows
Changing to the upsert write mode for an existing flow is not possible for some specific destinations like MySQL. In these cases, Dataddo creates indexes to ensure smooth system operations and as such, write mode chages to existing flows are restricted.
Use one of the following workarounds:
- If you can lose the data in the existing table without consequences or recover it through backfilling.
- Re-create the flow using upsert to ensure that the table and indexes are correctly established.
- If preserving the data is crucial:
- Delete the existing flow.
- Add a unique key index on the columns you wish to include in the composite key. For example, using the SQL query below.
- Create a new flow with upsert as the write mode and a composite key that incorporates the column on which you created the unique index.
ALTER TABLE table_name
ADD UNIQUE INDEX unique_index_name (column1, column2);