Facebook Ads is an advertising platform that allows businesses and individuals to create and manage targeted advertising campaigns on Facebook. It offers a range of tools and features for audience targeting, ad creation, and performance tracking to help businesses reach their desired audiences and achieve their advertising goals.
Refer to this page to see all available endpoints from the Facebook Ads API.
If you have multiple Facebook Ads accounts and would like to extract the same data from all of them, it's possible through multi-account extraction. Contact our Solutions team to enable this feature.
Authorize Connection to Facebook Ads
To authorize this service, use OAuth 2.0 to share specific data with Dataddo while keeping usernames, passwords, and other information private.
- On the Authorizers page, click on Authorize New Service and select your service.
- Follow the on-screen prompts to grant Dataddo the necessary permissions to access and retrieve your data.
- [Optional] Once your authorizer is created, click on it to change the label for easier identification.
Ensure that the account you're granting access to holds at least admin-level permissions. If necessary, assign a team member with the required permissions with the authorizer role to authenticate the service for you.
For more information, see our article on authorizers.
Using System User
The best practice is to create a dedicated Admin System User in Facebook (Meta) Business Manager. Here is the step-by-step guide:
- Go to business facebook manager and create a Business Manager account if you don’t already have one.
- Add your Facebook page to your Business Manager.
- Create a Facebook App: In the facebook developer portal create a new app (or use an existing one).
- Add a System User: In Business Manager, navigate to Business Settings > Users > System Users.
- Click Add to create a new system user (give it a name and assign it a role, usually “Admin” for full access).
- Assign Assets and Permissions: Assign your Facebook page as an asset to the system user.
- Grant the system user the necessary permissions for the page.
- Generate a System User Access Token: In the system user’s settings, click Generate New Token. (Select your app and the required permissions.)
- Use the System User Access Token to generate a System Page Access Token
How to Create a Facebook Ads Data Source
- On the Sources page, click on the Create Source button and select the connector from the list.
- From the drop-down menu, choose your authorizer.Didn't find your authorizer?
Click on Add new Account at the bottom of the drop-down and follow the on-screen prompts. You can also go to the Authorizers tab and click on Add New Service.
- Name your data source and select your metrics and attributes.

- [Optional] Configure your advanced settings. If you are unsure about how to proceed, we recommend skipping this step.
- Configure your sync frequency or set the exact synchronization time under Show advanced settings.DATADDO TIP
If you need to load historical data, refer to the Data Backfilling article.
- Preview your data by clicking on the Test Data button in the top right corner. You can adjust the date range for a more specific time frame.
- Click on Save and congratulations, your new data source is ready!
Limitations
Attributes Selection
You can select Facebook Ads attributes based on the reporting level.
The reporting level is a hierarchy-type report:
- 1st level: Account
- 2nd level: Campaign
- 3rd level: Adset
- 4th level: Ad
Find more information in Facebook's official documentation.
Historical Data Limitation
The Facebook Ads API has two limitations for historical data:
- You may load up to 90 days per extraction batch.
- In total, you may extract up to 37 months of historical data.
For more information, refer to our guide for data backfilling.
Limited Data Breakdown Combinations
Due to the Facebook Ads API, not all data insight breakdown combinations are viable. Dataddo offers a list of all possible combinations what are supported and won't cause issues for your data source.
Refer to Facebook's official documentation for the list of possible data insight breakdown combinations.
However, if you require a combination that is supported but not available in Dataddo, please contact our Solutions team.
Number of Metrics
The Facebook Ads API allows you to select up to 200 metrics per source.
Number of Rows
Under normal circumstances, the Facebook Ads API sets a hard limit on the total number of rows that can be extracted per call.
To overcome this limitation, Dataddo supports automatic pagination to make multiple calls and retrieve all your data.
Using Audience Breakdowns
Using both demographic and geographical dimensions to to break down the metrics according to the audience categories might lead to data discrepancies.
This is caused by underlying calculations which are based on data sampling. As such, while the data will have correct percentage values, the absolute values can be distorted.
Troubleshooting
Data Preview Unavailable
No data preview when you click on Test Data might be caused by an issue with your source configuration. The most common causes are:
- Date range: Try a smaller date range. You can load the rest of your data afterward using manual data load.
- Insufficient permissions: Please make sure your authorized account has at least admin-level permissions.
- Invalid metrics, attributes, or breakdowns: You may not have any data for the selected metrics, attributes, or breakdowns.
- Incompatible combination of metrics, attributes, or breakdowns: Your selected combination cannot be queried together. Please refer to the service's documentation to view a full list of metrics that can be included in the same data source.
Authorization Error
Broken Facebook sources that return the following error messages when testing the extraction (broken source > three dots > Test Extraction) must be reauthorized:
"response_status": "401 Unauthorized"
"Www-Authenticate": "OAuth \"Facebook Platform\" \"invalid_token\" \"You cannot access the app till you log in to www.facebook.com and follow the instructions given.\""
"response_body": "{\"error\":{\"message\":\"You cannot access the app till you log in to www.facebook.com and follow the instructions given.\",\"type\":\"OAuthException\",\"code\":190,\"error_data\":\"{\\\"checkpoint_url\\\":\\\"https:\\\\\\/\\\\\\/www.facebook.com\\\"}\",\"error_subcode\":459,\"fbtrace_id\":\"AUWZQsg7Opr7SEpp_lk9wUa\"}}"
Once reauthorized, make sure to load the missing data.
You can also click the Debug & Restart icon next to the broken source and Dataddo will show you step-by-step how to reauthorize your account and execute a manual data load.
Unable to Find Facebook Sub-Accounts
If your access rights have changed or you gained access to a new Facebook account, it's possible that your other accounts will not be immediately listed in Dataddo. To fix this, try the following steps:
Fully Reauthorize the Service
- Go to the Authorizers tab in Dataddo and delete the Facebook authorizer.Deleting an Authorizer
Please keep in mind that you will first need to delete all sources created with the authorizer. This will also affect your flows.
You can also temporarily switch the source using the authorizer to a different account before deletion.
- Go to your Facebook settings and navigate to the Business integrations tab.
- Find Dataddo and click on Remove.
- Now, go back to the Authorizers tab in Dataddo and authorize your Facebook account again.
Check Your Account Permissions
If the method above doesn't work, please check your Facebook account's permissions. To access insights, make sure the permissions are at least on the analyst/admin level.
Metric and Ad Recall Data Don't Match
The Reach and Recall metrics cannot be summed to get the totals for longer time periods. As these metrics measure the daily unique users who view your ad (= reach) or will remember the ad (=ad recall), it is not possible to get data for a specific time period and/or aggregate the data.
To avoid this, you can
- Get daily breakdowns: The daily values will match, but not when summed up over a longer time period.
- Extract data weekly or monthly: These weekly/monthly values will match.
Simply create a new source and a new flow with the particular breakdown (for example, a source and a flow with daily breakdowns/synchronizations).
Read more about the metrics, and why the data may not be matching here.
Show Image Asset URL as an Image
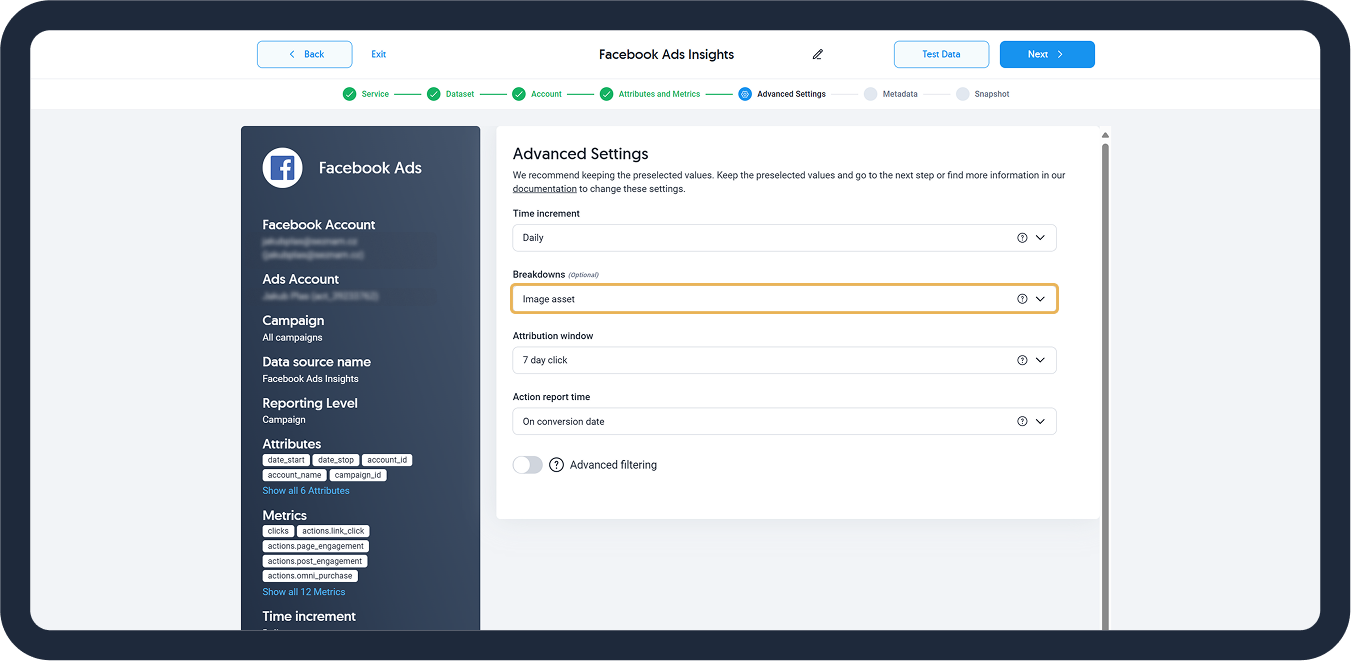
To have Image Asset URLs show as images in your destination, configure Advanced Settings during data source creation:
- For the Breakdown, select Image Asset.

- This breakdown adds the following fields to your table:
Image Asset ID,Image Asset Hash,Image Asset Name, andImage Asset URL.
- This breakdown adds the following fields to your table:
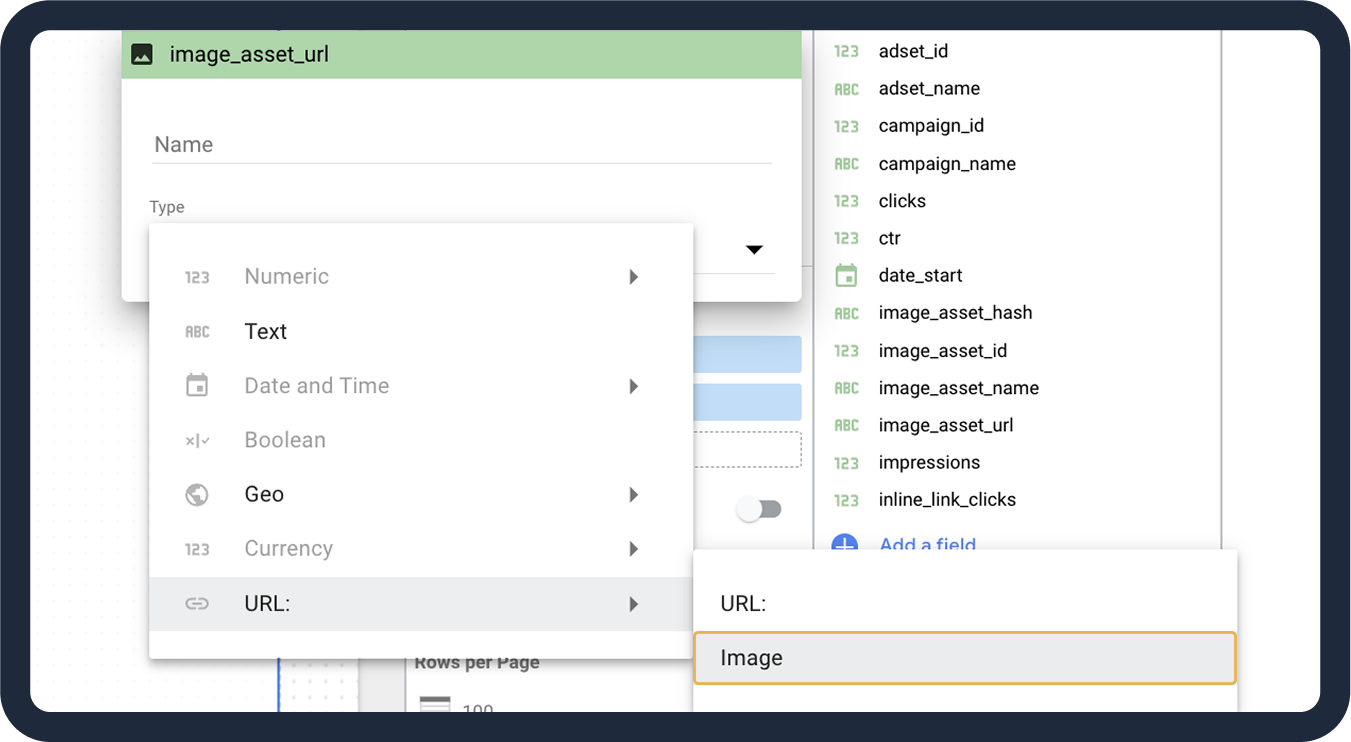
- In your destination (e.g. Looker Studio), change the URL type of the
Image Asset URLfield to image .

Related Articles
Now that you have successfully created a data source, see how you can connect your data to a dashboarding app or a data storage.
Sending Data to Dashboarding Apps
Sending Data to Data Storages
Other Resources