Power BI is a business intelligence and data visualization tool provided by Microsoft. It allows users to connect to various data sources, transform and model data, and create interactive visualizations and reports.
Power BI implementation Cheat Sheet
Using Dataddo direct connection to Power BI might not be an optimal solution for all the cases; e.g. when you need to work with large volumes of data with >100K rows per flow or you need to perform complex SQL transformations. Check the table below to find the optimal implementation for your specific case.
| Use case | Solution |
|---|---|
| Personal Dashboard | Configure connection for Personal Dashboard. |
| Personal Dashboard with automatic refresh | Configure connection for Personal Dashboard with On-premises Data Gateway. |
| Shared Dashboard with automatic refresh | Configure connection for Shared Dashboard. Make sure to configure automatic refresh. |
| Shared Dashboard with large volumes of data | Use Azure Blob Storage (or any other data lake) as your flow destination with CSV as output format. Then use Power BI native connection to Azure Blob Storage. |
| Shared Dashboard with complex data (SQL transformations needed) | Use database such as Azure SQL or Azure Synapse as your flow destination (each flow will represent a single DB table). Then use Power BI native connection to the chosen database. |
Create a New Data Flow to Power BI in Dataddo
- Navigate to Flows and click on Create Flow.
- Click on Connect Your Data to add your sources. Here, you can blend or union your data.
- Click on Connect Your Data Destination and navigate to the Dashboarding Apps tab to add your destination.
- Check the Data Preview to see if your data is correct.
- Name your flow and click on Create Flow.
A window with configuration details will pop up. Follow the instructions to finish the setup in your dashboarding app.
If you need to revisit the configuration details, simply go to the Flows tab and click on the power outlet icon.
Leave the window with configuration details in Dataddo open. If you can't find it, check this information again by clicking on power plug button with Connection Details.
Once your flow is set up in Dataddo, you will be presented with two options
- Personal Power BI Dashboard: For cases when you not planning sharing your Power BI Dashboard via Power BI Online.
- Shared Power BI Dashboard: Recommended if you plan to share your report or dashboard via the PowerBI Online Service.
Personal Power BI Dashboard
Make sure you have admin rights on your Windows device, if not, please configure connection for shared dashboard instead.
- In the configuration window in Dataddo, navigate to the PowerBI Personal Dashboard tab and click on download the Dataddo Power BI Connector installer appropriate for you Windows version.
- Extract the content of the downloaded zip file and open the Installer.exe file.
- The terminal window will appear when the installation runs. Press enter to exit. The connector is now installed on your computer.
- Open Power BI Desktop and under Get data, choose Dataddo (Beta) from the list of apps, and click on Connect.
- Insert the API key from Dataddo (your flow's connetion details window) and click on Connect again.
If you cannot see the Dataddo (Beta) connector in the list, please reinstall your Power BI.
Configure an On-Premises Data Gateway
Dataddo supports using on-premises data gateway in personal mode for automatic data refresh.
Download and Instal On-Premises Data Gateway
You can download on-premises data gateway from Microsoft's official website.
Gateway configuration
After installation, enable using Dataddo connector by selecting Connectors in the on-premises data gateway app. In Custom data connectors, under Load custom data connectors from folder, browse to and select a folder that the user running the gateway service can access. The default user is NT SERVICE\PBIEgwService.
The gateway will automatically load the custom connector files to that folder, and they appear in the list of data connectors.
Shared Power BI Dashboard
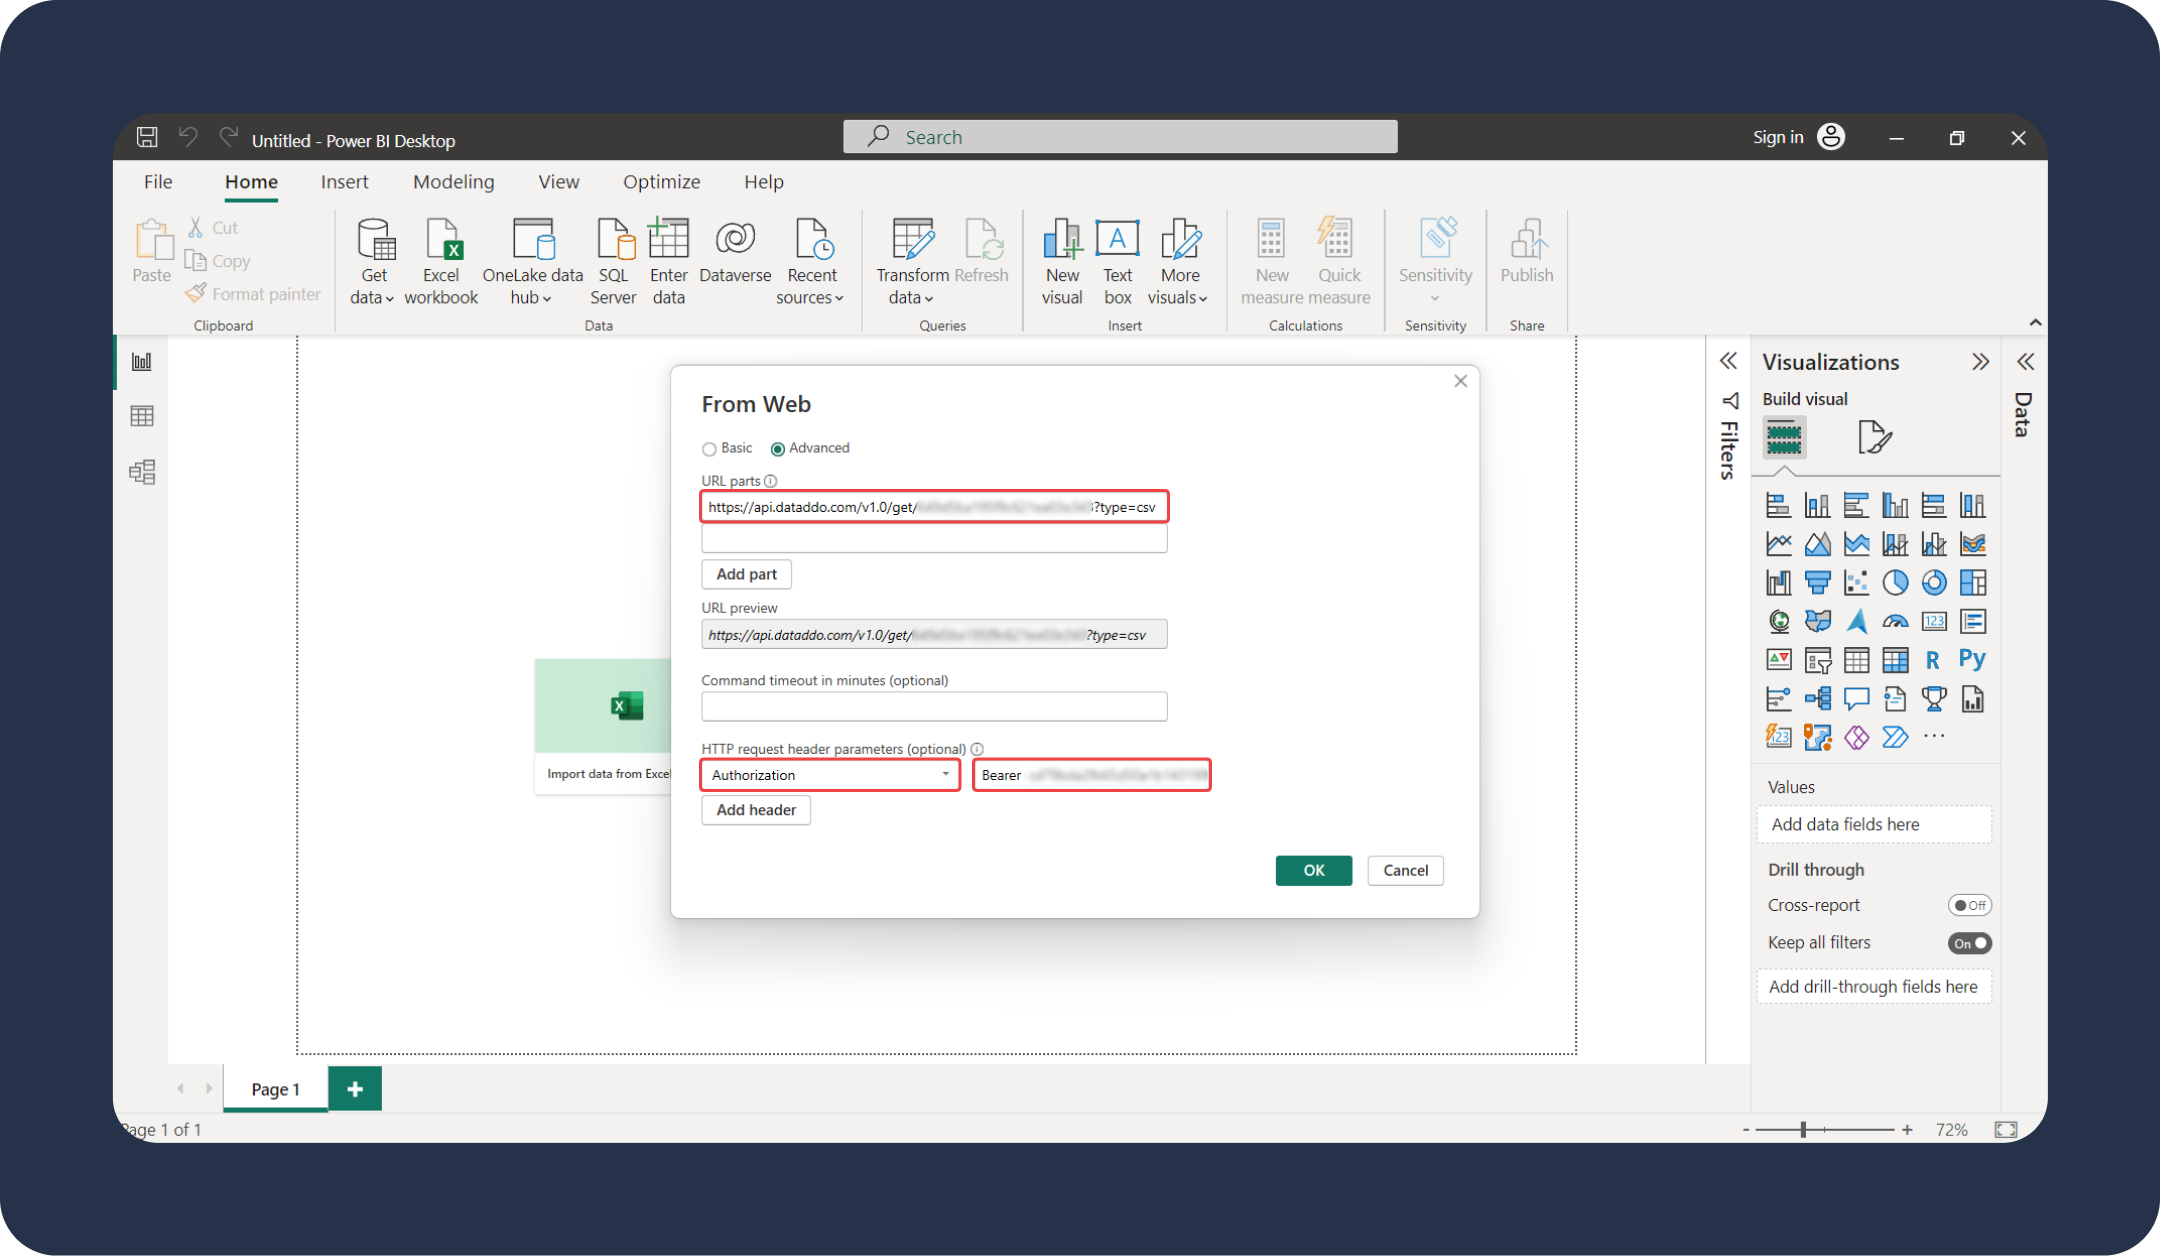
- In you Power BI Desktop, click on Get data and select Web.
- Click on Advanced.
- Insert the URL Path from the configuration window in Dataddo to the URL Parts section in Power BI. The value will be the following format:
https://api.dataddo.com/v1.0/get/aaaaaaaaaaaaaaaa0201b4f3?type=csv. - Under the HTTP Request Parameters section:
- Type Authorization to what appears as selection box.
- Insert the value of the authorization header. The value will be in the following format
Bearer aaaaaaaaaaaaaaaa744609253455d7ec3081e84c708e4d93a16548275382da40.
- Click on OK, and then Connect.
- Under the Home tab, click on Publish and select which workspace you want to publish your dashboard to.
If you want to share your report with others, please continue with the setup for report sharing below.
Share Report via Power BI Online Service
Dashboard sharing will not work if you are connecting via installed desktop plugin.
Schedule an automatic refresh to make sure your coworkers have accurate and fresh data.
- Under the My workspace tab on the Power BI website, click on the Schedule refresh button next to your dataset.
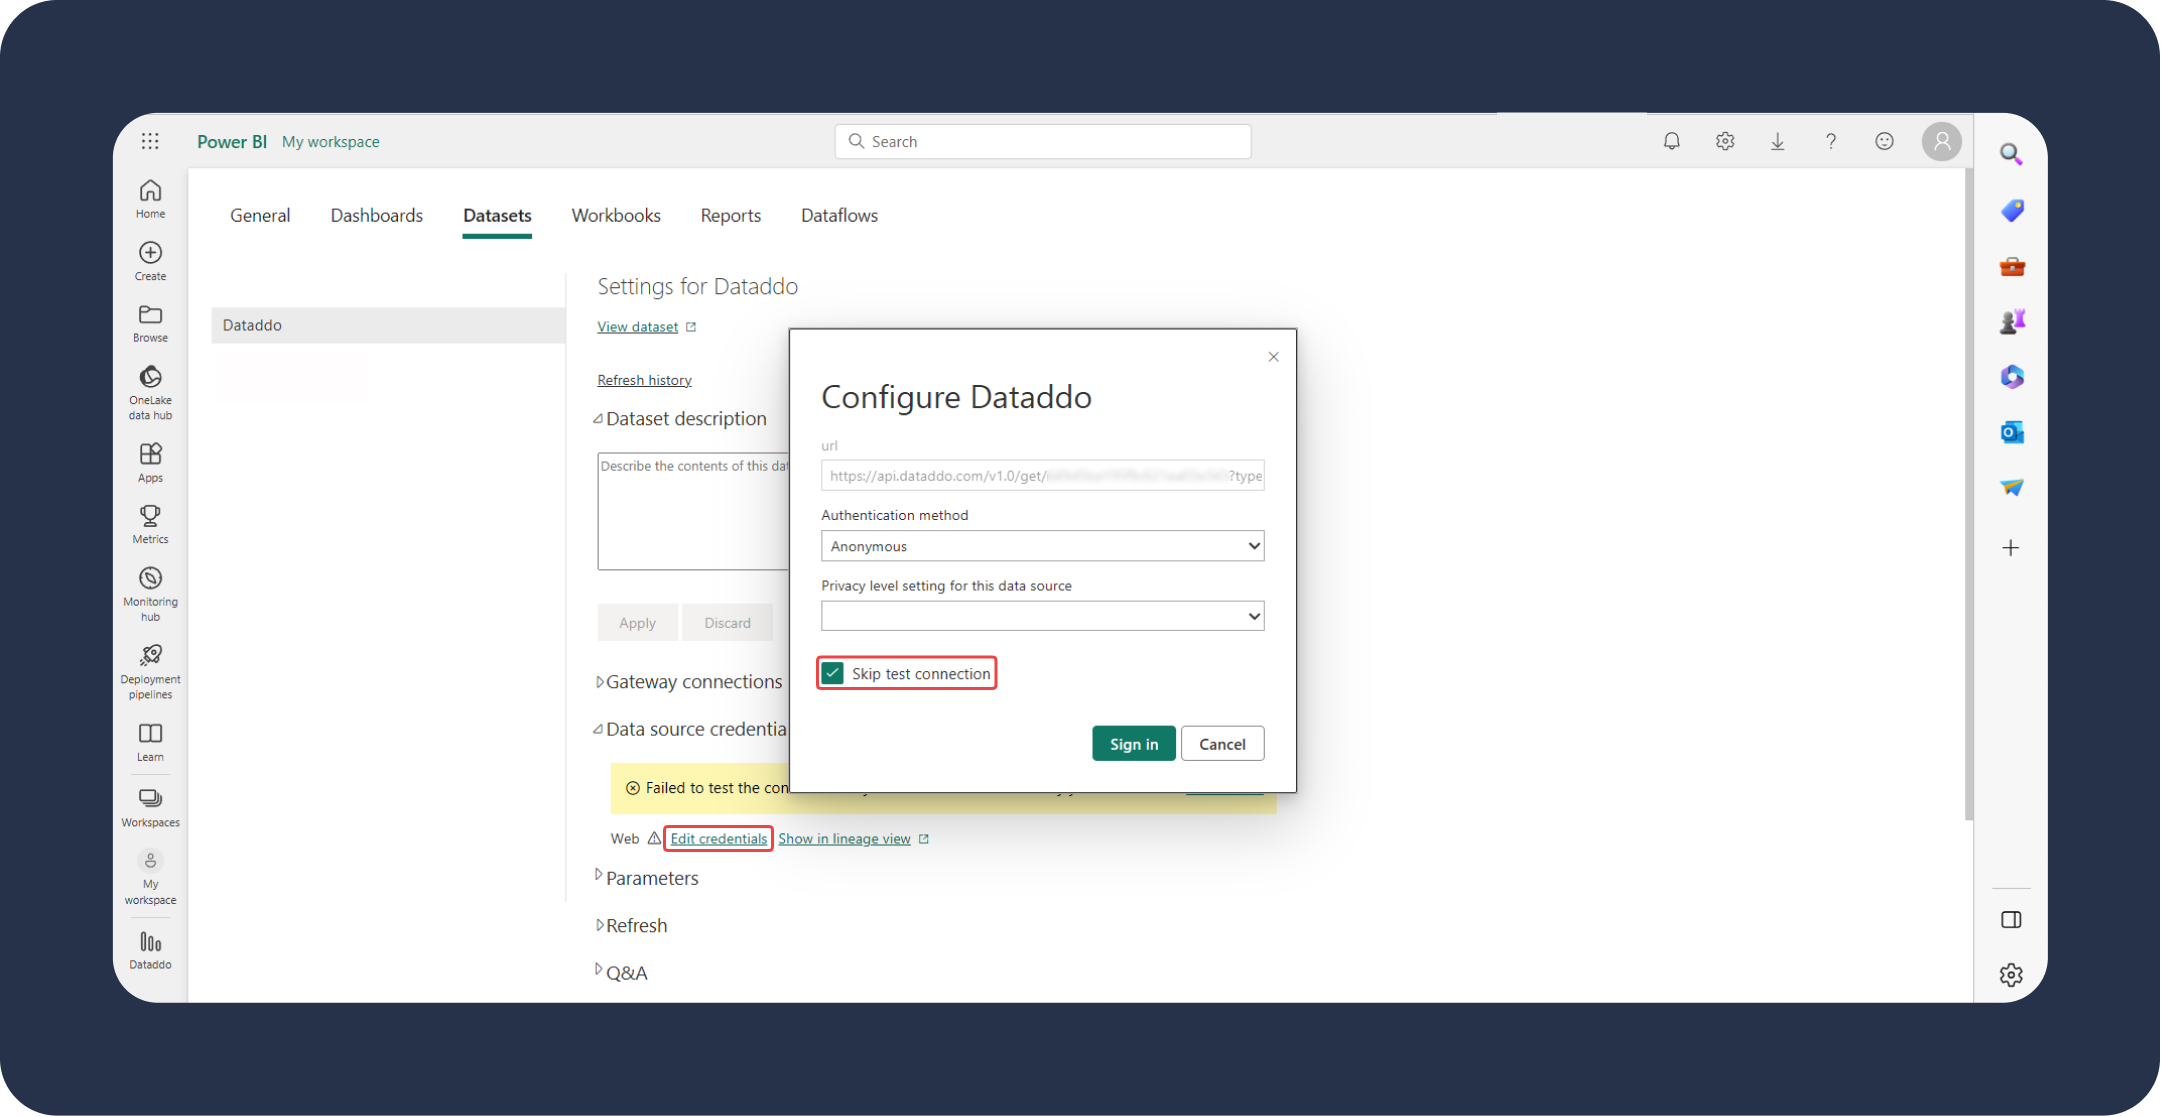
- Due to an error message stating that the credentials are invalid, you will be redirected to the Datasets Settings page. Under the Data Source Credentials section, click on Edit credentials.
- Check the Skip test connection option (other fields can stay unchanged) as it causes for the error message to pop up and confirm by clicking on Sign in.
- Go back to the list of your workspaces and click again on the Schedule Refresh button next to your dataset. Under the Refresh section, schedule your refresh schedule.
Limitations
There's a limit to how much data you can send to Power BI at once.
Before sending your data to Power BI, check the number of your rows by previewing your data. Click on the three dots next to your source or flow and select Data Preview.
The following list applies to the full Power BI service:
- Dataset size limit: There's a 1 GB limit for datasets stored in Shared capacities in the Power BI service. If you need larger datasets, you can use Power BI Premium.
- Distinct values in a column: When caching data in a Power BI dataset (sometimes called 'Import' mode), there is a 1 999 999 997 limit on the number of distinct values that can be stored in a column.
- Row limit: When using DirectQuery, Power BI imposes a limit on the query results that are sent to your underlying data source. If the query sent to the data source returns more than 1 million rows, Power BI will return an error and the query fails. Your underlying data can still contain more than 1 million rows. You're unlikely to run into this limit as most reports aggregate the data into smaller sets of results.
- Column limit: The maximum number of columns allowed in a dataset, across all tables in the dataset, is 16 000 columns. This limit applies to the Power BI service and to datasets used in Power BI Desktop. Power BI tracks the number of columns and tables in the dataset in this way, which means the maximum number of columns is 16 000 minus one for each table in the dataset.
- Data source limit per user: The maximum number of data sources allowed per user is 1 000. This limit applies to Power BI service only.
How to Avoid Limitations?
There are two ways to avoid the above-mentioned limitations.
- Limit the amount of data. It is also possible the amount is too large due to incorrectly configured snapshotting settings.
- Connect the data to a data warehouse first, and then to Power BI. Use a database like Google Sheets or opt for a data warehouse for more of a long-term solution, e.g. Azure Blob Storage.
Troubleshooting
Dataddo Power BI Connector Is Not Showing In Power BI
If you cannot see the connector in the list of apps, please reinstall your Power BI. There is not needed to reinstall the plugin as well.
Unable to Install the Dataddo Power BI Plugin
In case your device does not allow you to install the Dataddo Power BI plugin, proceed configuring a connection for a shared dashboard instead. As no installation is needed, this method is guaranteed to work.
Cannot Refresh or Connect Data
If an error message regarding a failed update of the data source pops up, go back to configuration to check the Skip test connection box, and confirm with Sign in.
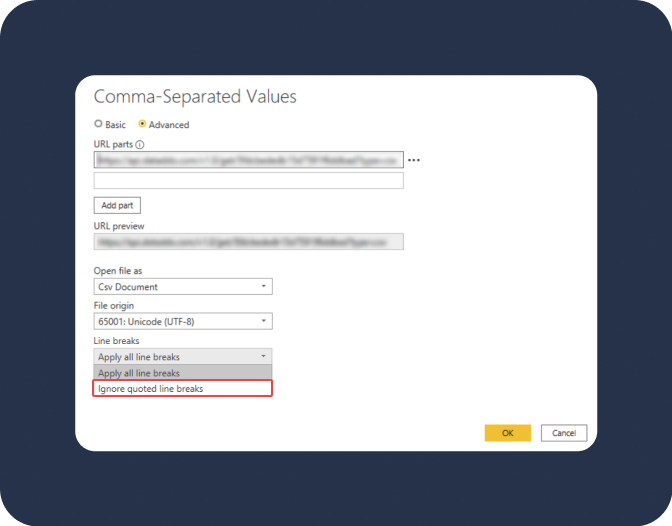
Power BI Unexpected Line Breaks
In some cases, your data in Power BI might be pushed into another column instead of simply showing null values. This happens when your data contains, for example, descriptions or other written content which is why some characters can be then interpreted as line breaks by Power BI.
To avoid this, when connecting Dataddo to Power BI, choose Ignore quoted line breaks for line breaks.