This guide walks you through the step-by-step process of configuring Azure Entra ID (formerly Azure Active Directory) for Single Sign-On (SSO) with Dataddo. By connecting Dataddo with your organization’s identity provider, you enable users to log in securely with their existing corporate credentials—eliminating the need for separate passwords and improving access control. The setup involves creating an Enterprise Application, configuring SAML settings, defining user attributes, and setting up a signing certificate to establish a trusted connection.
Adding Enterprise Application
Before you can configure SSO, you must register Dataddo as an Enterprise Application in your Azure Entra ID tenant. This step sets up the logical connection between Azure and Dataddo and allows you to manage authentication settings, assign users, and control access through Azure. In the steps below, we’ll walk you through creating that application.
- Log in to Azure Portal.
- Navigate to Azure Active Directory → Enterprise Applications.
- Click + New application.
- Select Create your own application.
- Choose Integrate any other application you don’t find in the gallery (Non-gallery).
- Give it a name (e.g., Dataddo SSO) and click Create.
Basic SAML Configuration
After creating the Enterprise Application, you’ll define how Azure sends login information to Dataddo using SAML. In this section, you configure the core settings—Entity ID, ACS URL (Reply URL), sign-on, and logout URLs—that form the backbone of the SAML handshake. These values must exactly match what Dataddo expects, so accuracy is key.
- In the newly created Enterprise Application → Single sign-on → choose SAML.
- In Basic SAML Configuration, set:
- Identifier (Entity ID):
https://app.dataddo.com - Reply URL (Assertion Consumer Service URL):
https://public-api.dataddo.com/api/v2/saml-acs - Sign on URL:
https://app.dataddo.com/sso-url/entra_id_saml/{{DATADDO_SSO_ID}} - Logout Url (Optional):
https://public-api.dataddo.com/api/v2/saml-logout
- Identifier (Entity ID):
Attributes & Claims
Once the basic SAML settings are in place, you need to tell Azure which user properties to send to Dataddo in each authentication request. Attributes & Claims define the identity information (such as email, names, and group membership) that your application consumes to recognize and authorize the user. The mappings below are the minimum required for Dataddo to validate and map users correctly.
What Dataddo Requires
These attributes must match exactly (including the namespace) to ensure the SSO integration works properly.
| Attribute URI | Description | Mapped from |
|---|---|---|
| http://schemas.xmlsoap.org/ws/2005/05/identity/claims/name | Primary identifier (email) | user.mail |
| http://schemas.xmlsoap.org/ws/2005/05/identity/claims/givenname | First name | user.givenname |
| http://schemas.xmlsoap.org/ws/2005/05/identity/claims/surname | Last name | user.surname |
All required attributes use the WS-2005 claims namespace http://schemas.xmlsoap.org/ws/2005/05/identity/claims/
Example Attribute Statement
<AttributeStatement>
  <Attribute Name="http://schemas.xmlsoap.org/ws/2005/05/identity/claims/name">
    <AttributeValue>user@example.com</AttributeValue>
  </Attribute>
  <Attribute Name="http://schemas.xmlsoap.org/ws/2005/05/identity/claims/givenname">
    <AttributeValue>First</AttributeValue>
  </Attribute>
  <Attribute Name="http://schemas.xmlsoap.org/ws/2005/05/identity/claims/surname">
    <AttributeValue>Last</AttributeValue>
  </Attribute>
</AttributeStatement>
Mapping in Azure Entra ID
In the Attributes & Claims configuration of your Enterprise Application:
- Click Edit next to Attributes & Claims.
- Add or adjust the following mappings:
- name → user.mail
- givenname → user.givenname
- surname → user.surname
Many organizations leave Entra ID’s default namespace prefixing in place. Dataddo fully supports the default WS-2005 claims namespace, so no special rewriting is needed—just make sure the attribute names match.
Configuring Certificate
To securely exchange SAML assertions between Azure Entra ID and Dataddo, a certificate is required. This certificate enables Azure to digitally sign the authentication tokens it issues, and allows Dataddo to verify that those tokens were indeed issued by Azure and haven’t been tampered with. In this section, we walk you through downloading the Azure signing certificate (in Base64 format) and uploading it into Dataddo’s SSO settings so trust is established between both systems.
In Azure Entra ID
- In Azure Portal → Azure Active Directory → Enterprise Applications.
- Open Recently created Enterprise Application.
- Go to Single sign-on → SAML.
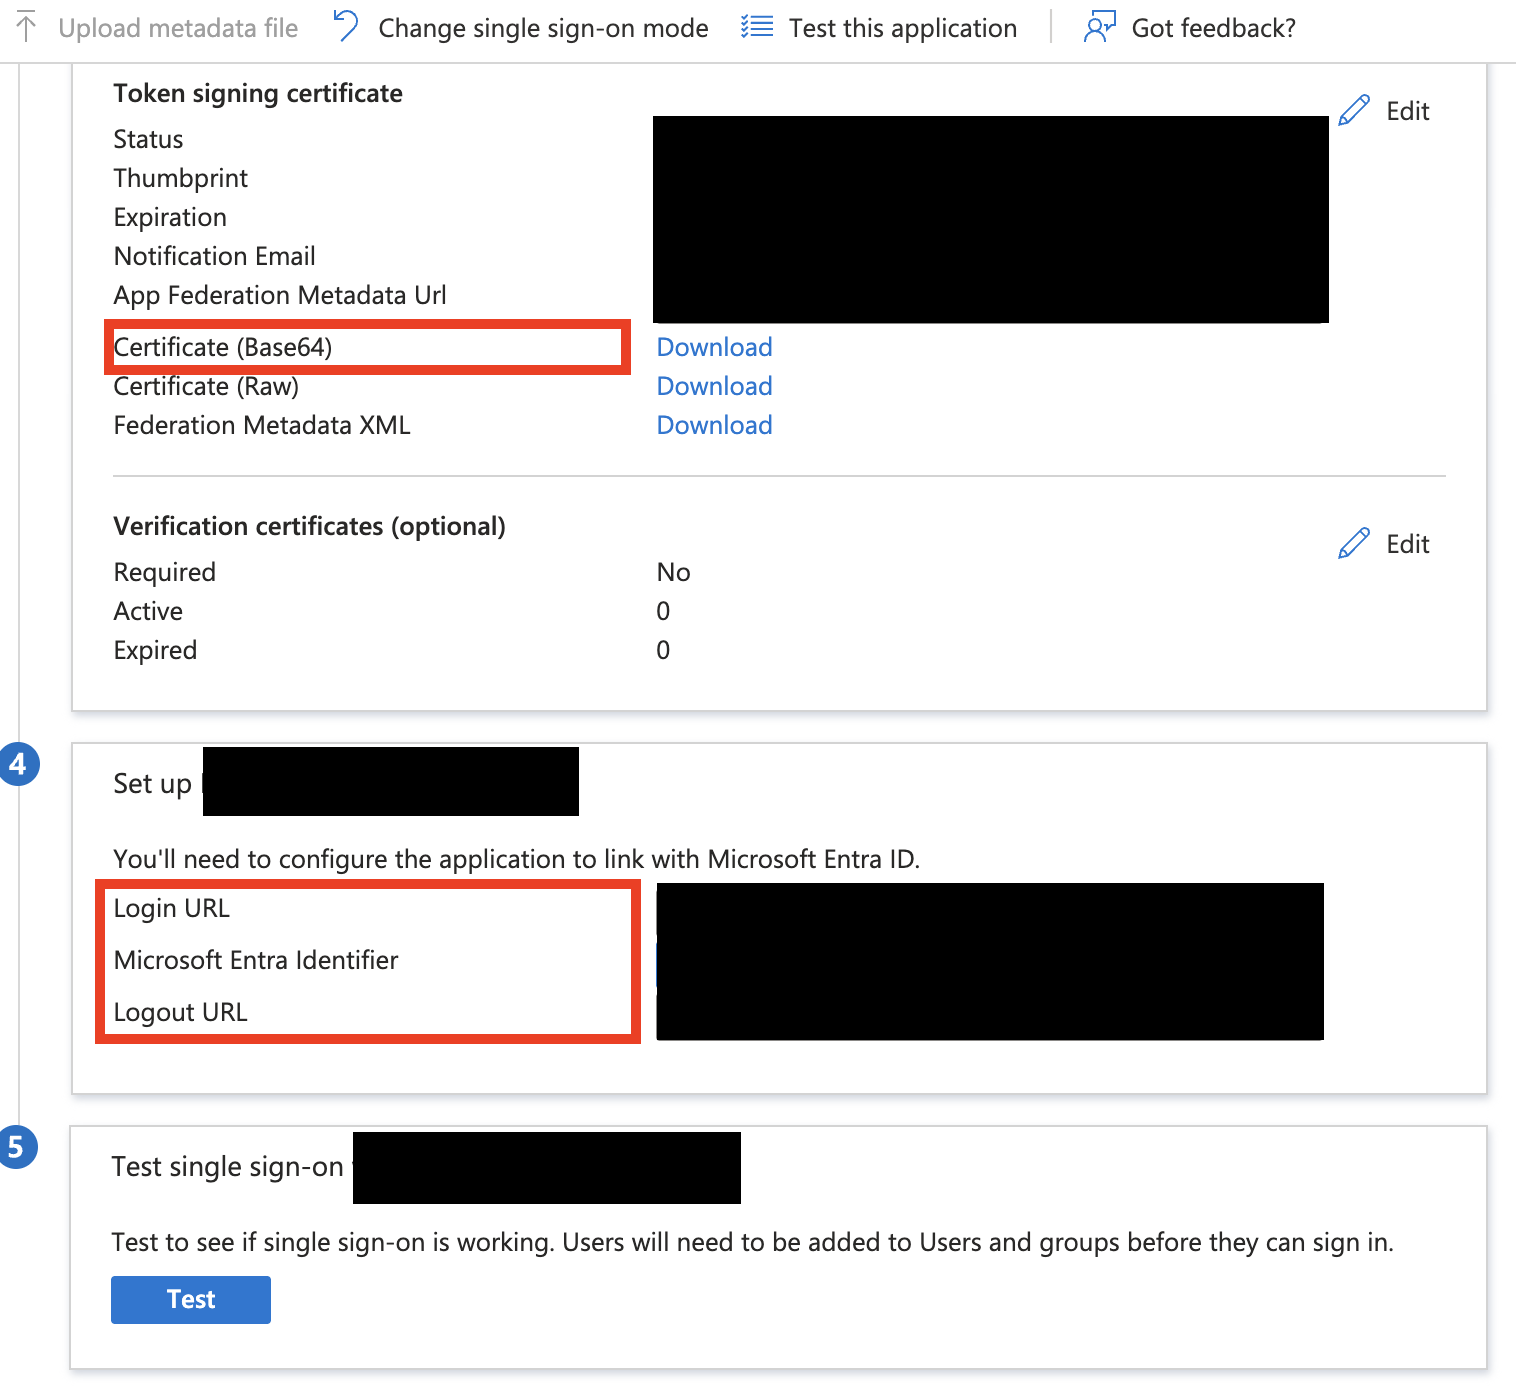
- Scroll down to section 3. SAML Signing Certificate.
- Click on Download next to Certificate (Base64).
- Save the downloaded certificate.
In Dataddo
- In Dataddo → Settings → Security
- Select Certificates tab.
- Click on New Certificate button and select Upload Certificate tab.
- Upload the recently donwloaded as x.509 certificate
Configuring Identifiers
In Azure Entra ID
- In Azure Portal → Azure Active Directory → Enterprise Applications.
- Open Recently created Enterprise Application.
- Go to Single sign-on → SAML.
- Scroll down to section 4. Copy over the values of Login URL, Microsoft Entra Identifier and Logout URL as they will be need for configuration of SSO in Dataddo.