NetSuite Analytics is a built-in business intelligence solution that provides real-time visibility into operational and financial data through interactive dashboards and saved searches. It features the SuiteAnalytics Workbook, which allows users to perform complex data exploration, pivot analysis, and visualization directly within the NetSuite environment without needing external tools.
Authorize Connection to NetSuite Analytics
Dataddo offers two separate authorizers for NetSuite:
- NetSuite, which uses the NetSuite REST API, and
- NetSuite Analytics, which uses SuiteAnalytics Connect (ODBC/JDBC).
Each connection method has different requirements, capabilities, and limitations. To ensure you choose the most suitable option for your use case, please contact your Dataddo account manager before setting up either connector.
- On the Authorizers page, click on Authorize New Service and select NetSuite Analytics.
- Fill in the following fields:
- Server IP or Hostname: Your NetSuite Analytics address in the following format
account_id.connect.api.netsuite.com. - Username: Your NetSuite Analytics username.
- Password: Password to your NetSuite Analytics account.
- Port: Depending on your server's configuration, this is typically port 1708.
- Account ID: ID of your NetSuite Analytics account, which can be found in your account URL.
- Role ID: ID of your account role. Find the role ID in Setup > Users/Roles > User Management > Manage Roles (Administrator) > Internal ID column.
- Server IP or Hostname: Your NetSuite Analytics address in the following format
- Rename your authorizer for easier identification and click on Save.
How to Create a NetSuite Analytics Data Source
- On the Sources page, click on the Create Source button and select the connector from the list.
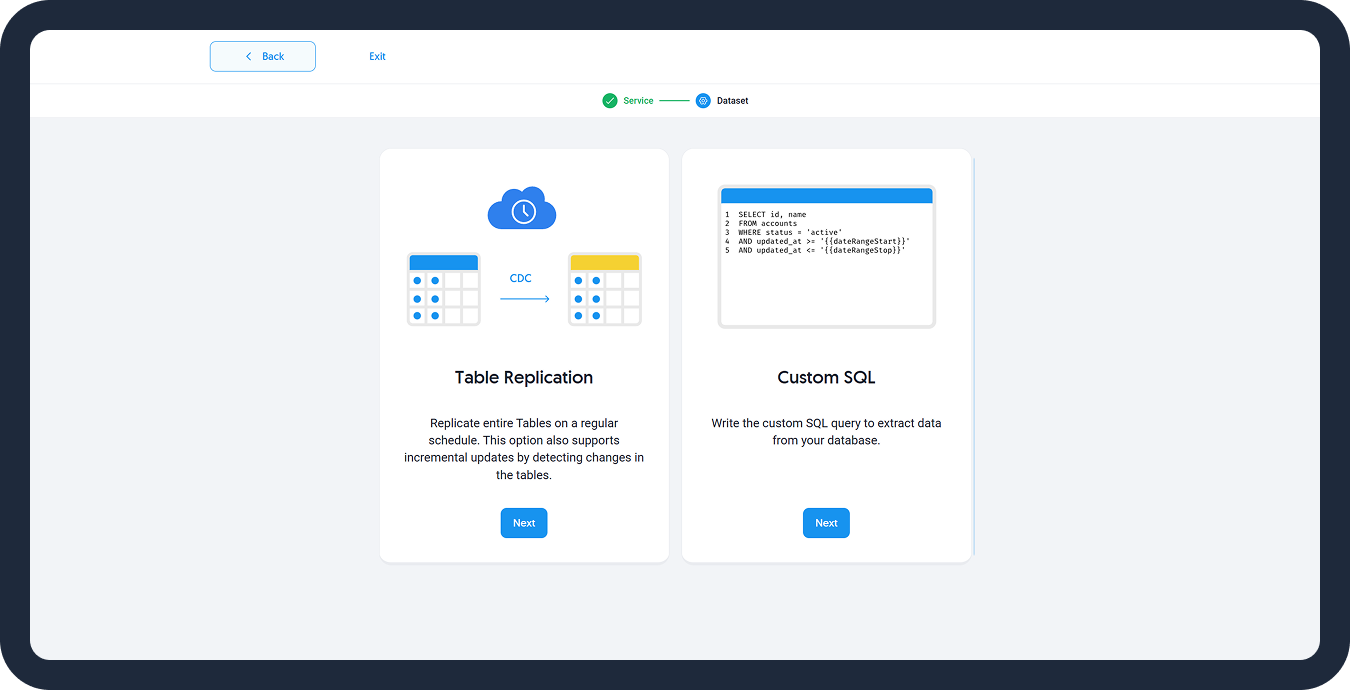
- Select one of the following depending on your use case.
- Table Replication: The most common method for replicating a whole table. It copies data from the source table and loads it into the destination.
- Custom SQL: Use a custom SQL query to define and extract a specific subset of data. This is useful for filtering data, joining multiple tables, or creating a unique dataset before loading it into your destination.
- From the drop-down menu, select your authorizer.
Didn't find your authorizer?
Click on Add new Account at the bottom of the drop-down and follow the on-screen prompts. You can also go to the Authorizers tab and click on Add New Service.
- Name your data source. The next step depends on your selection.
| Table Replication | Custom SQL |
|---|---|
On the Data Model step:
|
On the Query step: Provide your custom SQL to retrieve the data of the new source. Note that the preview is limited to 100 rows, however, the source will apply the limit specified in your query. |
Finish Source Creation
- Configure your sync frequency or set the exact synchronization time under Show advanced settings.
DATADDO TIP
If you need to load historical data, refer to the Data Backfilling article.
- Preview your data by clicking on the Test Data button in the top right corner. You can adjust the date range for a more specific time frame.
- Save the configuration and congratulations, your new data source is ready!
Troubleshooting
Data Preview Unavailable
No data preview when you click on Test Data might be caused by an issue with your source configuration. The most common causes are:
- Date range: Try a smaller date range. You can load the rest of your data afterward using manual data load.
- Insufficient permissions: Please make sure your authorized account has at least admin-level permissions.
- Invalid metrics, attributes, or breakdowns: You may not have any data for the selected metrics, attributes, or breakdowns.
- Incompatible combination of metrics, attributes, or breakdowns: Your selected combination cannot be queried together. Please refer to the service's documentation to view a full list of metrics that can be included in the same data source.
Related Articles
Now that you have successfully created a data source, see how you can connect your data to a dashboarding app or a data storage.
Sending Data to Dashboarding Apps
Sending Data to Data Storages
Other Resources