Determ, previously known as Mediatoolkit, is a media monitoring and analytics tool that helps businesses track and analyze mentions of their brand, competitors, or industry in online media and social networks. It provides real-time alerts, sentiment analysis, and reporting features, allowing users to stay informed about relevant discussions and sentiments related to their brand or topics of interest.
## Authorization
Refer to our website for the list of metrics and attributes available in Dataddo.
Authorize Connection to Determ
In Determ
To authorize your Determ account, you will need your Organization ID and an Access Token.
- In your Determ account, check the URL you are redirected to. You will see an address such as
https://app.determ.com/123456/. Organization ID is the string after the URL, e.g.123456. -
- Click on Settings in the top right corner, and select Account Settings.
- Copy the Access Token.
In Dataddo
- On the Authorizers page, click on Authorize New Service and select Determ.
- Fill in the following fields:
- Organization ID: String after your Determ URL (e.g.
123456fromhttps://app.determ.com/123456/). - Access Token: Determ access token.
- Organization ID: String after your Determ URL (e.g.
- Rename your authorizer for easier identification and click on Save.
How to Create a Determ Data Source
- On the Sources page, click on the Create Source button.
- Select the connector from the list and name your data source.
- On the Dataset step, select your dataset.DATADDO TIP
If you're unsure which dataset to select, use the search bar to look for datasets with the desired attributes or metrics.
- On the Account step select your authorizer from the drop-down menu.Didn't find your authorizer?
Click on Add new Account at the bottom of the drop-down and follow the on-screen prompts. You can also go to the Authorizers tab and click on Add New Service.
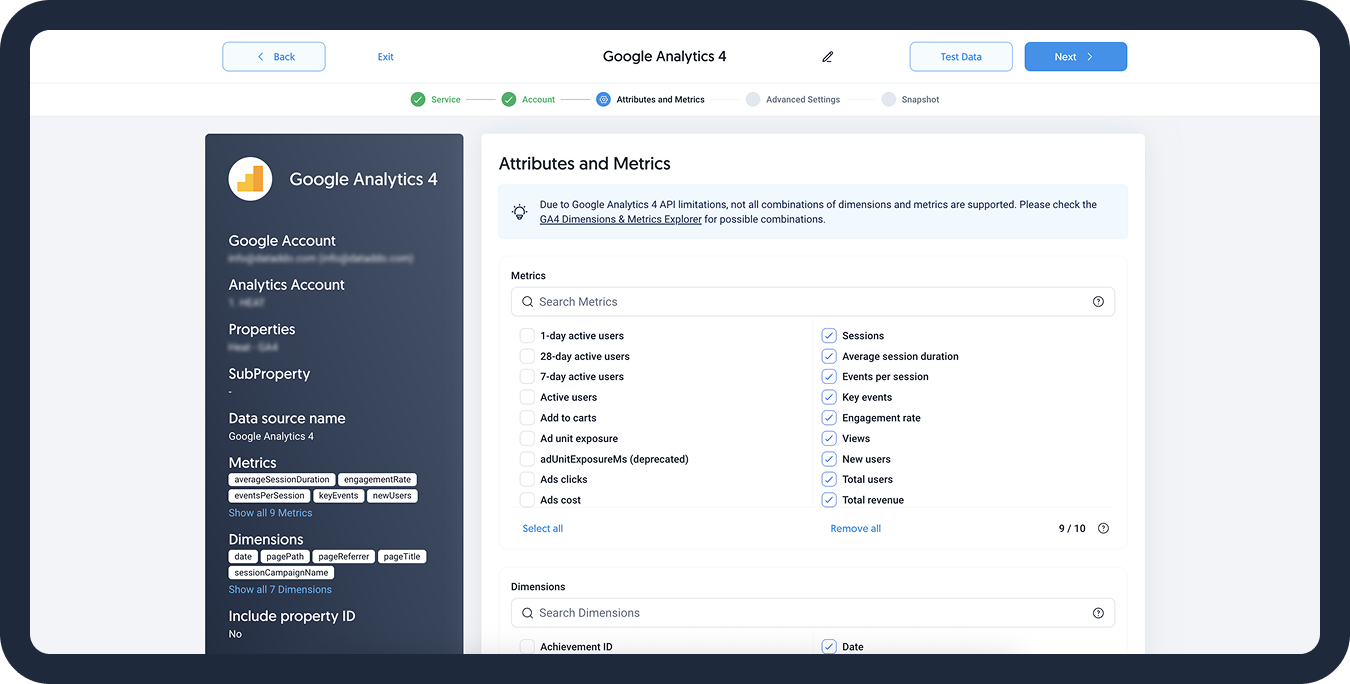
- On the Attributes and Metrics step, select the metrics and attributes you want to extract.
- On the Metadata step, select which metadata fields such as extraction time to add to your data.
- On the Snapshot step:
- Configure your sync frequency or click Show advanced settings to set the exact synchronization time.DATADDO TIP
To load historical data, refer to the Data Backfilling article.
- [Optional] Enable the Allow Empty Data Extractions toggle to allow the extraction when no data is available.
- Configure your sync frequency or click Show advanced settings to set the exact synchronization time.
- In the top-right corner, click Test Data button to preview extracted data. Adjust the date range for specific time frame.
- Click on Save and congratulations, your new data source is ready!
Limitations
Troubleshooting
Data Preview Unavailable
No data preview when you click on Test Data might be caused by an issue with your source configuration. The most common causes are:
- Date range: Try a smaller date range. You can load the rest of your data afterward via manual data load.
- Insufficient permissions: Please make sure your authorized account has at least admin-level permissions.
Related Articles
Now that you have successfully created a data source, see how you can connect your data to a dashboarding app or a data storage.
Sending Data to Dashboarding Apps
Sending Data to Data Storages
Other Resources